Tag Archives: honey

Fruit Crostata (Galette aka Free Form Tart)

Let’s start with the exciting news! My blog was nominated for the Blog on Fire Award by One Picture, A Million Words! I’m so honored to be nominated! Thank you! There are official rules to accepting this nomination, including nominating eight other blogs and sharing eight things about yourself. I’m still working on that part (hey, I need to be thorough! Don’t rush me!) but I just wanted to formally say “thanks” for the nomination! Post coming soon with my eight nominations.
I love The Chew. Yes, I’ve mentioned that before but every week I laugh at their antics, drool over the food, and get inspired by this show. It’s so genuine and so unlike any other cooking show!  We’ve made dozens of recipes from the show and most have been fantastic. Last week I made Carla’s Blooming Onion (or rather, “Flower Power”). We’ve done several Sunday Suppers from The Chew as well.

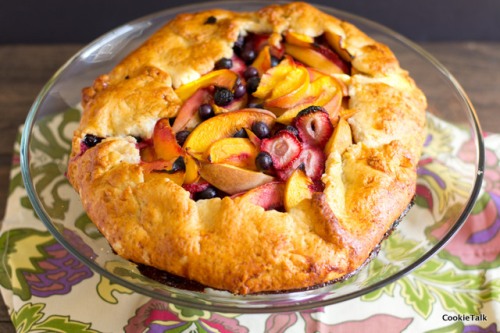
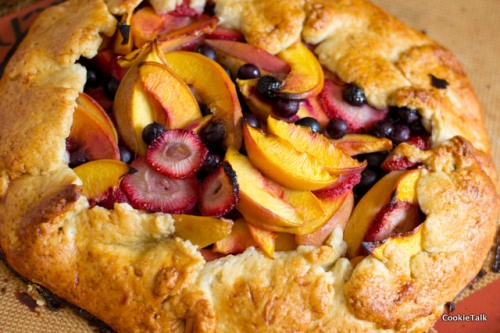
I didn’t tweak this crostata at all, except for the type of berries I used. Mario used all blackberries, but I used strawberries and blueberries, along with peaches of course, because that is what I had available. You could use any fruit and it would be delicious. I’m looking forward to trying it with apples and cranberries this fall. The dough is so easy to work with and actually one of my favorite doughs that I’ve had. I’m not a big fan of pie, I mean, I ‘ll eat it, but the crust is my least favorite part of a pie. Not for this crostata! I probably could have eaten it all by itself. Ok, maybe a little fruit.

Don’t skip the honey and egg glaze…makes it oh so irresistible!

Crostatas (galette) are a lot easier and more forgiving than a pie. If you are afraid of making pie because of the crust looking crazy, then this is for you! It’s supposed to look a little crazy! That makes it “rustic” and therefore cool. Don’t you love that? I sure do.
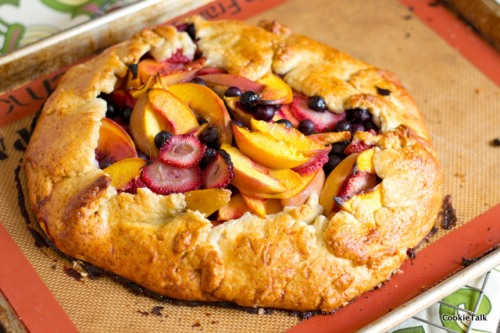
Peach & Berry Crostata

From Mario Batali

One year ago: Lime & Blackberry Italian Meringue Pie (funny that a year ago was a pie, don’t you think? It’s a good one too!)

Yield: One 12 inch crostata

Difficulty: Easy

Time: Hands on 20 minutes; chill time 30 minutes; bake time 1 hour

Ingredients

  • For the Dough:
  • 2 1/2 cup Cake Flour (plus more for dusting)
  • 3 tablespoons Sugar
  • 1/2 teaspoon Salt
  • Grated Zest of 1 Lemon
  • 1 cup (2 sticks) cold unsalted Butter (cut into small chunks)
  • 1/4 cup Ice Water plus more if needed
  • For the Filling:
  • 5 Large Ripe Peaches (pitted and cut into 16 slices each)
  • 2 pint Fresh Blackberries
  • Juice of 1 Lemon
  • 3 tablespoons Sugar
  • 1 tablespoon All-purpose Flour
  • To Finish:
  • 2 tablespoons Honey
  • 1 Large Egg (at room temperature)
  • 1 cup Mascarpone or Freshly Whipped Cream

Directions

1. Add flour, sugar, salt, and lemon zet to food processor or stand mixer with paddle attachment. Mix briefly to combine. Add butter and mix until coarse crumbs (if using food processor then pulse quickly). Add water 1 TB at a time, allowing plenty of time between additions to be absorbed. Add until dough comes together but is not wet or sticky. Should be easy to handle. If you add too much water, add a tablespoon of flour. Flatten into a disk, wrap in plastic, and chill for at least 30 minutes.

2. Meanwhile, preheat your oven to 365F. Slice your peaches into approximately 16 slices each. If you are using strawberries, slice them too. Add  the lemon, sugar, and flour to the fruit and toss gently to combine. Set aside.

3. Remove dough from refrigerator. If it is too cold, let soften at room temperature a little. But, colder dough is easier to work with so don’t let it warm up too much. Colder dough will require less flour to dust. Dust your work surface and rolling pin very lightly. The more flour you add, the tougher your dough will be so refrain from constantly dusting your dough. Move it around frequently to keep it from sticking. And, don’t worry about it being perfect. We’re going for rustic, remember? Roll it to about 16 inch circle and 1/4 inch thick.

5. If you have a 12 inch tart pan with removable bottom, you can use that. I only have a 9 inch and that would have been too small. Thus, I just used a sheet pan and did free form. Do whatever is easiest for you. If you do free form, just place the dough on your sheet pan (lined with parchment or silpat). It may hang over a bit at first but you’ll fix that in a second.

6. Dump your fruit into the center. I actually had to take some of my fruit out because it was too much! Once the fruit is in the center, fold the edges in, leaving plenty of the fruit to show, but make sure it is also folded over enough so the fruit doesn’t fall out. There’s no rule on how to do this, just fold it over so that it stays together and the fruit stays put.

7. Mix together the honey and egg and brush over the entire crostata, including the fruit. It will act as a delicious glaze and help the crostata brown nicely.

8. Bake for about 1 hour to 1 hour and 10 minutes. Start checking about 50 minutes. Once it is golden brown and the fruit bubbly, it is ready!

9. Top with fresh whipped cream (I’d avoid adding sugar to the whip cream…otherwise it will be too sweet) and enjoy!

3 Comments

Filed under baking, Pie

Skillet Cornbread

My first memories of cornbread are in Southern Ohio where I have family. My great uncle and great grandma would make all the fixin’s with fried chicken, beans, cornbread, and I’m sure other things (Mom, what else?).

But I am from much farther north where this kind of food doesn’t really exist, at least in my world. So it was weird to me. I wasn’t a terribly adventurous eater as a kid either. And I just thought cornbread was strange and I assumed I didn’t like it, even though I don’t recall ever trying a bite until I was an adult. And I love it.  I wonder what I missed by not trying my great uncle’s cornbread from years ago.

Now this Yankee is living in the Deep South where cornbread is king, and you absolutely do not ever put any sugar or anything sweet in your cornbread. Because that is wrong and only Yankees do such terrible things. So of course I make cornbread with honey. That’s how I like it.

For a long time I made jalapeño cornbread from Ina Garten. I still love that recipe, but it is less cornbread-y, makes a lot, and takes a little more effort. I’ve recently adapted this simple recipe to meet our needs. It makes a small amount and the mix comes together in less time than it takes the oven to preheat. I’m sure that any additions like cheddar and chives would be delightful, but I haven’t tried  yet. If you do please let me know how it turns out. And making cornbread in a cast iron skillet just makes it oh so good. It gets that nice brown, buttery crust but the rest is light and airy. I don’t know how anyone couldn’t like cornbread when trying this fresh out of the oven with a slab of butter, and maybe even a little more honey!

Skillet Cornbread

Adapted from Alex G. 

Yield: 1 six inch pan of cornbread

Difficulty: Very easy

Time: 10 minutes to prep, 25 minutes to bake

Note: If you look at the original recipe, it is designed for a 9 inch skillet. My recipe is not exactly halved and changes have been made so doubling my recipe will not yield the same as the original. I’ve not made the original so I can’t vouch for it but I’m sure it is still delightful.

Another Note: A reminder that I always bake with unsalted butter and whole milk. You should too.

Ingredients

  • 1/2 cup + 2 TB coarse cornmeal
  • 1/4 cup + 2 TB flour
  • 1/2 tsp salt
  • 1 tsp baking powder
  • 1/4 tsp baking soda
  • 2/3 cup buttermilk (to make your own add a splash of vinegar to your milk and let sit for 5 minutes)
  • 2 eggs
  • 2 TB honey
  • 4 TB melted butter, slightly cooled, plus one more for the pan

Directions

1. Preheat oven to 425F. Place a six inch cast iron skillet in the oven to warm up.  After the oven is almost preheated, add a tablespoon of butter to the cast iron pan and return to oven until completely preheated. (Don’t have a cast iron skillet? They are dirt cheap on Amazon and a really wonderful pan. I use mine all the time for just about everything. All natural non-stick, no icky Teflon. So I recommend getting one. Still not convinced? A cake pan will work fine, but no need to preheat it for as long.  And make sure you butter the sides too. It will stick to a cake pan.)

2. In a medium bowl mix together the cornmeal, flour, salt, baking powder, and baking soda.

3. In a separate bowl, mix together the buttermilk, eggs, honey, and melted butter. Pour the wet into the dry and mix just until combined. Don’t over mix.

4. Remove the cast iron from the oven (carefully…it’s obviously hot!). Pour the mixture into the pan.

5. Lower the oven temperature to 375F. Bake for 25 minutes, or until a toothpick comes out completely clean. You want the cornbread to have a nice brown crust and hold together. Let cool for just a minute, then flip onto a cutting board. Cut into wedges and enjoy!

14 Comments

Filed under baking, bread

Granola Bars

I’ve been making granola for a couple of years now. It’s great to sprinkle on yogurt or just have as a snack. However, this was my first time making granola bars. I was browsing through an old Food & Wine Magazine and found a delicious  recipe for granola bars. However, I didn’t have everything in the ingredient list, nor did I want everything in the ingredient list. So I modified it and came out with a very addicting granola bar. It’s not perfect, in fact, they are a bit gooey, but for a first time making these, I’m in love!

Here’s a link to the original recipe, Sticky Oat and Pine Nut Bars

I like pine nuts, but they aren’t my favorite. And I love pepper, but just not in my sweets. I can’t seem to get into the pepper and sweet thing (though I love chocolate and chilis…). So I took both of those out and substituted almonds and cinnamon. Ah, that’s more like it! Oh, and instead of dipping the bars in white chocolate, I put the chocolate in the batter.

These are super easy to make, the hardest part is waiting for them to cool!

Almond & Cinnamon Granola bars

Modified slightly from Food & Wine Sticky Oat and Pine Nut Bars

  • 1 stick unsalted butter, plus more for greasing pan
  • 3/4 cup honey
  • 1/2 cup packed brown sugar
  • 2 cups old fashioned oats
  • 1 1/2 cups chopped almonds
  • 1 tsp cinnamon
  • Pinch of salt
  • 4 oz white chocolate

1. Preheat the oven to 325F. Butter an 8 inch square baking pan. Line the bottom and sides with parchment paper.

2. In a large saucepan, melt the butter with the honey and sugar and cook over moderate heat, stirring constantly until an amber caramel forms, about 5 minutes.

Stir in the oats, almonds, cinnamon, and salt and cook, stirring constantly, about 2 minutes. Remove from heat and stir in the white chocolate. It will melt. Scrape the mixture into the prepared pan and smooth the surface.

Bake for about 20 minutes, or until bubbling and brown on the edges.

It will smell absolutely intoxicating at this point, but you must resist the urge to remove the bars from the pan! They need to cool completely in order to have any hope of staying together. Mine were gooey, so I probably should have let them cool longer, but it was just about impossible! They smelled  so yummy! After they are cooled, lift parchment from pan and move bars to cutting board. Cut into whatever size you desire. I did pretty small squares since they are sweet.

I found these to be a great pre-running snack, but I think they’d be great just about anywhere. Just wrap a bar in parchment and away you go!

63 Comments

Filed under granola