Tag Archives: dessert

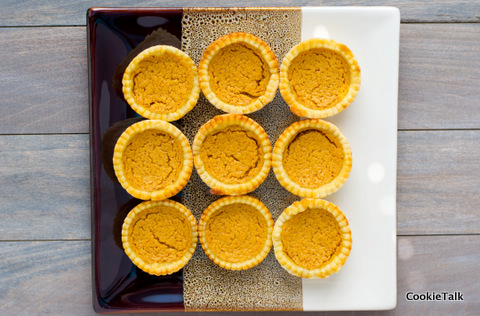
Mini Sweet Potato Pies

I’ve lived in the South for just over two years now and since then I’ve embraced plenty of good Southern food: fried pickles (pure genius!), Real BBQ (sometimes Northerners like to call Sloppy Joes “BBQ”…tsk tsk!),  pimento cheese (more on that soon), and corn bread. But I shunned sweet potato pie. I love sweet potatoes, especially sweet potato fries. But growing up my only impression of sweet potato pie was this sickly sweet thing with marshmallows on top. No thank you!

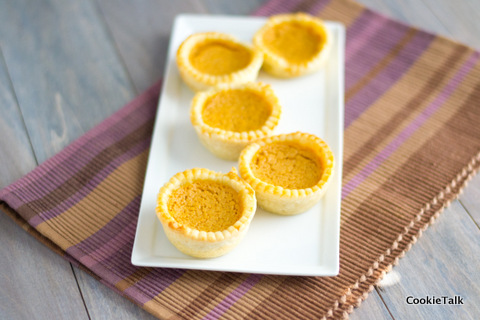
But as I’ve discovered time and time again, when something is properly prepared it is delicious. Just because you didn’t like it the first time doesn’t mean won’t like it the next time.  So if you too grew up with that marshmallow concoction that was rather scary, give this a try. You’ll be delighted. It tastes like pumpkin pie, and who doesn’t like pumpkin pie?

I made mine mini since they were for a social event and it is much easier to eat mini pies than try and slice out pieces. Takes a bit more time but they are super cute! If you have no need to make mini ones a big pie will be just as tasty.

Mini Sweet Potato Buttermilk Pie

Adapted from Smitten Kitchen

One year ago: Peanut butter blondies with chocolate and sea salt

Yield: One 9 inch pie or about 20 mini pies

Difficulty: Easy

Time: Filling batter 10 minutes if using canned puree; Dough 10 minutes plus chill time; Rolling out dough will depend on whether you are doing mini or full pie

Ingredients

  • 1 1/2 pounds sweet potatoes (about 2 medium potatoes), peeled and chopped into a 1/2-inch dice*
  • 4 tablespoons unsalted butter, melted
  • 2 tablespoons fresh lemon juice (optional)
  • 1/2 teaspoon freshly grated nutmeg
  • 1/2 teaspoon ground cinnamon
  • 1/2 teaspoon kosher salt
  • 3 large eggs, separated
  • 1/2 cup brown sugar
  • 2 tablespoons all-purpose flour
  • 3/4 cup full- or low fat buttermilk*
  • Pie dough

Notes: I used canned organic sweet potato puree, because, well, I had it sitting in my pantry. It worked just fine and sped up the process if you are in a hurry. If you don’t have buttermilk on hand (and really, who does?) make your own by adding 1 TB vinegar to 1 cup milk. Let sit at room temperature until curdled, about 5 to 10 minutes.

Directions

1. Prepare your pie dough. Preheat oven to 350F. If making a full pie, roll out the dough large enough to fit your pie pan and press gently into pie pan. Blind bake (cover dough with foil and fill with dried beans or pie weights) for 10 minutes or until just barely golden. If making mini pies, I used a 4 inch cookie cutter and a muffin tin. You will have to re-roll scraps several times. Chill dough again if it becomes too tough to handle. I did not use weights when blind baking but just pushed it back down after baking. Let cool completely while you prepare your filling.

2. Preheat the oven to 375°F.

3. Pour 1 1/2 inches of water into a 3-quart stock part with a strainer basket suspended over it and bring to a boil over medium-high heat. Add the sweet potatoes, cover and steam until fork-tender, about 20 minutes. Place the steamed sweet potatoes in a large bowl and let cool to room temperature. Mash them into a smooth puree with a food mill. You should have 1 1/4 cups puree; discard any excess. Or just open a can of sweet potato puree and measure out 1 1/4 cups into your mixer bowl. Add the butter, lemon juice if using, nutmeg, cinnamon and salt and mix on low speed until thoroughly combined.

4. In a small bowl, beat the egg yolks lightly with a whisk, about 30 seconds. Add the sugar and beat until they’re a creamy lemon-yellow color, about 1 1/2 minutes. Add the egg mixture to the sweet potato mixture and stir until the eggs are thoroughly incorporated and the filling is a consistent bright orange color. Add the flour a little at a time, stirring after each addition until thoroughly incorporated. Add the buttermilk and again stir until smooth and even.

5. With a cleaned whisk (or electric hand mixer), whisk the egg whites to soft peaks in a clean, dry bowl. With a rubber spatula, gently fold the egg whites into the sweet potato-buttermilk mixture until thoroughly combined. Pour the mixture into the prebaked crust and bake on the middle rack of the oven until the center is firm and set, 35 to 40 minutes. If making mini pies, bake about 20 minutes until center springs back when touched.

6. Remove the pie from the oven and cool completely on a rack. Serve at room temperature (or cold from the fridge; you can cover it with plastic wrap before chilling) with a dollop of whipped cream. Enjoy!

4 Comments

Filed under baking, Pie

Fruit Crostata (Galette aka Free Form Tart)

Let’s start with the exciting news! My blog was nominated for the Blog on Fire Award by One Picture, A Million Words! I’m so honored to be nominated! Thank you! There are official rules to accepting this nomination, including nominating eight other blogs and sharing eight things about yourself. I’m still working on that part (hey, I need to be thorough! Don’t rush me!) but I just wanted to formally say “thanks” for the nomination! Post coming soon with my eight nominations.

I love The Chew. Yes, I’ve mentioned that before but every week I laugh at their antics, drool over the food, and get inspired by this show. It’s so genuine and so unlike any other cooking show!  We’ve made dozens of recipes from the show and most have been fantastic. Last week I made Carla’s Blooming Onion (or rather, “Flower Power”). We’ve done several Sunday Suppers from The Chew as well.

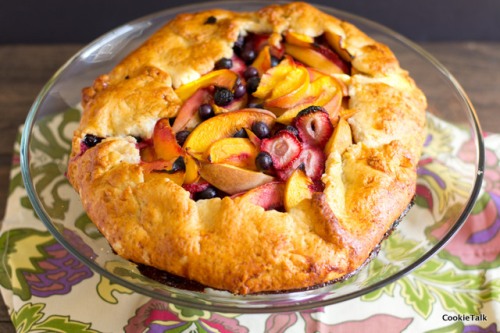
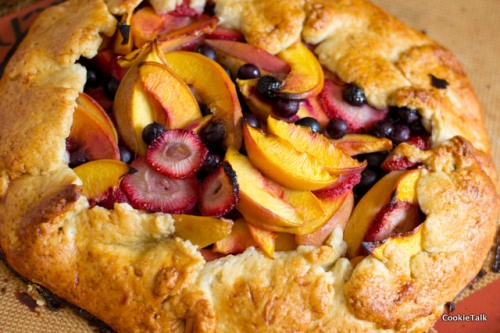
I didn’t tweak this crostata at all, except for the type of berries I used. Mario used all blackberries, but I used strawberries and blueberries, along with peaches of course, because that is what I had available. You could use any fruit and it would be delicious. I’m looking forward to trying it with apples and cranberries this fall. The dough is so easy to work with and actually one of my favorite doughs that I’ve had. I’m not a big fan of pie, I mean, I ‘ll eat it, but the crust is my least favorite part of a pie. Not for this crostata! I probably could have eaten it all by itself. Ok, maybe a little fruit.

Don’t skip the honey and egg glaze…makes it oh so irresistible!

Crostatas (galette) are a lot easier and more forgiving than a pie. If you are afraid of making pie because of the crust looking crazy, then this is for you! It’s supposed to look a little crazy! That makes it “rustic” and therefore cool. Don’t you love that? I sure do.

Peach & Berry Crostata

From Mario Batali

One year ago: Lime & Blackberry Italian Meringue Pie (funny that a year ago was a pie, don’t you think? It’s a good one too!)

Yield: One 12 inch crostata

Difficulty: Easy

Time: Hands on 20 minutes; chill time 30 minutes; bake time 1 hour

Ingredients

  • For the Dough:
  • 2 1/2 cup Cake Flour (plus more for dusting)
  • 3 tablespoons Sugar
  • 1/2 teaspoon Salt
  • Grated Zest of 1 Lemon
  • 1 cup (2 sticks) cold unsalted Butter (cut into small chunks)
  • 1/4 cup Ice Water plus more if needed
  • For the Filling:
  • 5 Large Ripe Peaches (pitted and cut into 16 slices each)
  • 2 pint Fresh Blackberries
  • Juice of 1 Lemon
  • 3 tablespoons Sugar
  • 1 tablespoon All-purpose Flour
  • To Finish:
  • 2 tablespoons Honey
  • 1 Large Egg (at room temperature)
  • 1 cup Mascarpone or Freshly Whipped Cream

Directions

1. Add flour, sugar, salt, and lemon zet to food processor or stand mixer with paddle attachment. Mix briefly to combine. Add butter and mix until coarse crumbs (if using food processor then pulse quickly). Add water 1 TB at a time, allowing plenty of time between additions to be absorbed. Add until dough comes together but is not wet or sticky. Should be easy to handle. If you add too much water, add a tablespoon of flour. Flatten into a disk, wrap in plastic, and chill for at least 30 minutes.

2. Meanwhile, preheat your oven to 365F. Slice your peaches into approximately 16 slices each. If you are using strawberries, slice them too. Add  the lemon, sugar, and flour to the fruit and toss gently to combine. Set aside.

3. Remove dough from refrigerator. If it is too cold, let soften at room temperature a little. But, colder dough is easier to work with so don’t let it warm up too much. Colder dough will require less flour to dust. Dust your work surface and rolling pin very lightly. The more flour you add, the tougher your dough will be so refrain from constantly dusting your dough. Move it around frequently to keep it from sticking. And, don’t worry about it being perfect. We’re going for rustic, remember? Roll it to about 16 inch circle and 1/4 inch thick.

5. If you have a 12 inch tart pan with removable bottom, you can use that. I only have a 9 inch and that would have been too small. Thus, I just used a sheet pan and did free form. Do whatever is easiest for you. If you do free form, just place the dough on your sheet pan (lined with parchment or silpat). It may hang over a bit at first but you’ll fix that in a second.

6. Dump your fruit into the center. I actually had to take some of my fruit out because it was too much! Once the fruit is in the center, fold the edges in, leaving plenty of the fruit to show, but make sure it is also folded over enough so the fruit doesn’t fall out. There’s no rule on how to do this, just fold it over so that it stays together and the fruit stays put.

7. Mix together the honey and egg and brush over the entire crostata, including the fruit. It will act as a delicious glaze and help the crostata brown nicely.

8. Bake for about 1 hour to 1 hour and 10 minutes. Start checking about 50 minutes. Once it is golden brown and the fruit bubbly, it is ready!

9. Top with fresh whipped cream (I’d avoid adding sugar to the whip cream…otherwise it will be too sweet) and enjoy!

3 Comments

Filed under baking, Pie

Christmas in July: Gingerbread Ice Cream Sandwiches

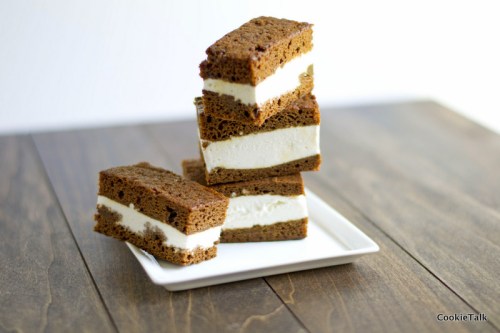
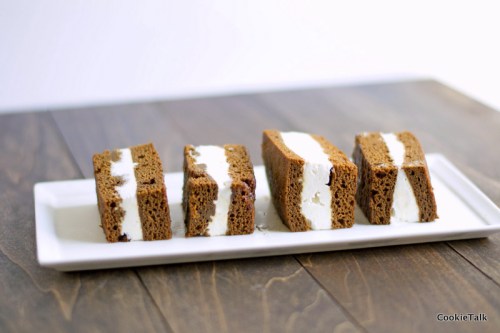
I know it isn’t quite July, but close enough. I assume you have planned out your 4th of July menu? No? Well, dessert is now decided. It’s easy, delicious, and a bit surprising: gingerbread ice cream sandwiches.

Gingerbread need not be reserved for just Christmas.  But no one really wants a rich, spicy cake when it is 100 degrees out. Gingerbread just seems way too heavy all by its lonesome. But freeze it and add some ice cream? Well, that is a whole different ball game.

This treat is fast and easy to make. You do have to turn your oven on, but only for 30 minutes, tops, including preheating.  It doesn’t have to be perfect (I think it looks better if it is not), can be cut to any size you want, and you can even use whatever ice cream you want. Although I think vanilla is best, but that’s just me.

Thanks to Gourmet Live Blog for suggesting this in the first place. Apparently June 5th is “National Gingerbread Day.” Yes, that does make perfect sense. I just don’t know why.

This recipe is also a one bowl wonder. One more reason to love it, right?

P.S. Did you notice I have a Facebook page now? Yes, I know, way to join the 21st Century. Just click “Like” over there on the right and join in the fun!

One year ago: Blackberry Buttermilk Cake

Gingerbread Ice Cream Sandwiches

From Gourmet Live

Yield: One half sheet pan of cake; sandwiches will depend on how you make them

Difficulty: Easy

Time: 10 minutes to make batter; 15 minutes to bake; 10 minutes to spread ice cream and cut into sandwiches

Ingredients

  • 1/2 cup butter, melted
  • 3/4 cup packed brown sugar
  • 1/2 cup molasses (not blackstrap)
  • 1 large egg
  • 1 1/2 tsp ground ginger
  • 1 tsp baking soda
  • 1/2 tsp salt
  • 1/2 tsp cinnamon
  • 2 cups AP flour
  • 2/3 cup boiling water
  • 1 1/2 qt ice cream (vanilla is my preference)

Directions

1. Preheat oven to 350F. Butter a half sheet pan (cookie sheet) and then line with parchment.

2. In a large bowl, mix together the butter, brown sugar, molasses, and egg. Then add the ginger, baking soda, salt, cinnamon and flour. Mix until combined. It will be a bit thick at this point. Add your boiling water and stir. It will thin to a nice cake batter.

3. Spread on your sheet pan. Try to make it even, but not a huge deal if it isn’t perfect. Bake for 12 to 15 minutes or until toothpick comes out clean. Let cool completely. To speed things up, put it in the freezer.

4. Let your ice cream soften at room temperature. It will be easier to spread when it is soft.

5. Cut the entire sheet in half crosswise, basically into two squares. One will be your top, one will be your bottom. Spread the ice cream on one side. Top with the other. Freeze until ice cream is set again. Cut into desired sizes and shapes. Yes, a cookie cutter would be just fine here. You’ll just have to eat the scraps though. So terrible, huh?

6. Freeze until ready to eat. You can wrap them in parchment and freeze or just use a freezer bag. They keep quite nicely.

Enjoy!

153 Comments

Filed under cake, frozen treat

Chocolate Chip Hazelenut Biscotti

Biscotti, how I love thee!

Ok, I know, I’ve been out of commission for what, six weeks now? I have lots of good reasons, and probably a few that aren’t so great. First, I’m taking a couple of online writing classes, which is the biggest reason I’m not blogging since I’m busy writing for a grade. Second, everything that can break seems to have broken, including my Kitchen Aid Stand Mixer (insert tears here).  That will be a separate post.

In the meantime…I’m making bread by hand and making other doughs with my hand mixer (also a Kitchen Aid…). Biscotti was perfect for the hand mixer, other than me being annoyed at having to stand there holding it. Yeah, I know, I’ve gotten lazy with my big, (sort of) powerful stand mixer. I have to actually pay close attention now! Can you imagine? Hmph.

This is an easy recipe and is actually the same as the Cinnamon Hazelnut Biscotti, but I took out the cinnamon and added espresso and hazelnuts. I originally had espresso in the title but that was bordering on obnoxiously long. And you could really use this recipe as a base for whatever you wanted. And for me, biscotti really hits the spot first thing in the morning when you are sitting down for coffee after a good workout or yard work. It’s a great way to start your day.

Chocolate Chip Hazelnut Biscotti

adapted from Bon Appetit Desserts

  • 3 cups unbleached AP Flour
  • 1 TB baking powder
  • 1/2 tsp salt (I prefer sea salt)
  • 2 tsp espresso powder (optional, but adds a nice touch)
  • 1 cup hazelnuts, toasted and husked*
  • 3/4 cup sugar
  • 1/2 cup (1 stick) butter, somewhere in between room temperature and cold.
  • 1 tsp vanilla extract
  • 3 large eggs, room temp
  • 1 1/2 cups chocolate chips

*To husk the hazelnuts: spread in a single layer on a sheet pan and bake in oven at 350F for about 10 minutes until very fragrant. Cover with a towel. Cool slightly and then rub together.   The skins will come off fairly easily.  Don’t fret if you don’t get all the skins. A little won’t hurt.

1. Preheat oven to 350F. Prepare two baking sheets with either silpat or parchment. Whisk together flour, baking powder, salt, and cinnamon. Set aside.

2. Chop hazelnuts in food processor until slightly chunky. How chunky depends on your preference.

3. Place butter, sugar, vanilla, and zest in stand mixer and mix until light and fluffy, about 3 to 5 minutes. Add eggs one at a time and mix until combined. Scrape the bowl after each addition. Add flour mixture. When flour is almost completely mixed, fold in the chopped hazelnuts and chocolate chips.

4. Divide the dough in half and place on prepared sheet pans. Flatten dough into an even rectangle. If you want to cut them diagnol, keep it narrow and long. If you want to cut just straight, make it wider. Bake for 20 to 25 minutes until golden on the edges. Remove from oven (but keep oven on),  let cool slightly and carefully move to a cutting board. Slice slightly on the diagonal. Return pieces to the sheet pan. Bake about 10 minutes. Flip pieces, bake 10 minutes more, or until desired crispiness. Careful that they don’t burn, but also make sure they are golden enough to be crunchy. Make coffee, and enjoy!


8 Comments

Filed under Cookies

Cheesecake Deconstructed: Lemon Blueberry Cheesecake Parfaits

I was recently cleaning out my recipe baskets, which are (were) full of magazines, printed recipes, and who knows what else, when I found a stack of old Food & Wine Magazines. It was like Christmas going through them and finding all the pages marked with recipes that I never made. I needed a dessert for dinner and found something unique and new: Lemon Blueberry Cheesecake Parfaits. It tastes like cheesecake but in the form of custard. Very rich, very sweet, but fresh and light at the same time.

I think my custard was a little runnier than it was supposed to be, just from comparing the picture in the magazine, but it was still very tasty. I made the shortbread and compote the day before, and the custard the day of dinner.

The shortbread is good all by itself, and very easy to make. The cornmeal adds a nice crunch and slightly salty taste. The custard was a little more complicated, as custards usually are, but never fear, they are still doable.  When tempering the eggs, add all the milk very slowly. And, make sure you stir until hot because corn starch needs heat to be activated. You will see it suddenly start to thicken and that is what you want. If you take it off the heat too soon, it will not thicken as it cools.

It’s a great dessert for a dinner party because all the components can be made in advance, making your job as a host easy. They will think you slaved for days in the kitchen, just for them. And there’s no reason to tell them otherwise.

Lemon & Blueberry Cheesecake Parfaits

From Food & Wine Magazine, contributed by Maggie Leung

Shortbread

  • 1 3/4 cups all-purpose flour
  • 1/4 cup plus 2 tablespoons cornmeal
  • 1 teaspoon salt
  • 2 sticks unsalted butter, at room temperature
  • 3/4 cup confectioners’ sugar
  • 2 teaspoons finely grated orange zest
  • 1 teaspoon pure vanilla extract
  1. In a medium bowl, mix the flour with the cornmeal and salt. In a standing mixer fitted with the paddle, mix the butter with the confectioners’ sugar at medium speed until creamy, about 2 minutes. Beat in the orange zest and vanilla extract. Add the flour mixture and beat at low speed until the dough just comes together. Pat the shortbread dough into a disk, wrap in plastic and refrigerate for 1 hour.
  2. Preheat the oven to 350°. Line 2 large rimmed baking sheets with parchment paper. Unwrap the chilled shortbread dough and roll it out between 2 sheets of parchment paper to an 8-inch round (1/2 inch thick). Cut the dough into 1/2-inch-wide strips and transfer the strips to the baking sheets; leave 1 inch between each strip. Refrigerate the dough strips for 30 minutes, until chilled.
  3. Bake the shortbread for about 20 minutes, until golden; rotate the pans halfway through for even baking. While the warm shortbread strips are still on the baking sheet, cut them into 1/2-inch cubes. Let cool, about 30 minutes.


Blueberry Compote

  • 2 cups blueberries (12 ounces)
  • 1/4 cup granulated sugar
  • 1/4 cup water
  • 1 teaspoon freshly squeezed lemon juice

In a small saucepan, combine 1 cup of the blueberries with the sugar and water. Bring to a simmer and cook over moderate heat until the blueberries break down, about 5 minutes. Scrape the blueberry sauce into a blender, add the lemon juice and puree until smooth. Scrape the blueberry sauce into a bowl and fold in the remaining 1 cup of whole blueberries. Refrigerate until chilled, about 2 hours.

Cheesecake Custard

  • 1 cup whole milk
  • 5 tablespoons granulated sugar
  • 4 large egg yolks
  • 2 1/2 tablespoons cornstarch
  • 6 ounces cream cheese, at room temperature
  • 1/4 cup plus 2 tablespoons fresh lemon juice
  • 1 teaspoon finely grated lemon zest, plus extra strips for garnish
  • 1 teaspoon pure vanilla extract
  • 1 cup heavy cream
  1. In a medium saucepan, bring 3/4 cup of the milk to a boil with 3 tablespoons of the sugar; remove from the heat.
  2. In a medium bowl, whisk the egg yolks with the cornstarch and the remaining 1/4 cup of milk and 2 tablespoons of sugar.
  3. Gradually whisk the hot milk into the egg yolks, then pour the mixture into the saucepan and whisk constantly over moderate heat until thickened, about 2 minutes. (This took longer for me, closer to 5 minutes). To get a smoother custard, strain at this point.
  4.  Over low heat, whisk in the cream cheese, lemon juice, grated lemon zest and vanilla extract until smooth, about 1 minute. Scrape the cheesecake custard into a bowl. Press a piece of plastic wrap directly onto the surface of the custard and refrigerate until chilled, about 2 hours.
  5. In a medium bowl, using an electric mixer, beat the cream to medium peaks. (I added Grand Marnier) Fold the whipped cream into the chilled cheesecake custard until no streaks remain. Spoon the shortbread cubes and custard into bowls. Drizzle with the blueberry compote, garnish with the lemon zest strips and serve.

5 Comments

Filed under cheesecake, custard