Tag Archives: smitten kitchen

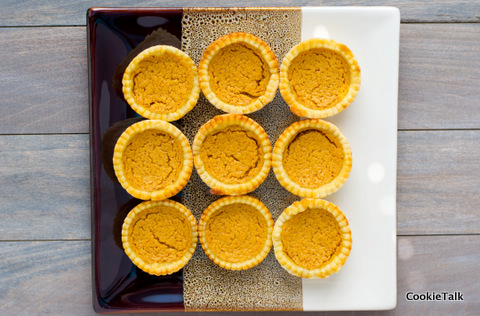
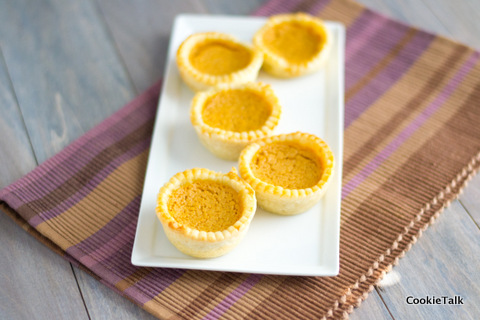
Mini Sweet Potato Pies

I’ve lived in the South for just over two years now and since then I’ve embraced plenty of good Southern food: fried pickles (pure genius!), Real BBQ (sometimes Northerners like to call Sloppy Joes “BBQ”…tsk tsk!),  pimento cheese (more on that soon), and corn bread. But I shunned sweet potato pie. I love sweet potatoes, especially sweet potato fries. But growing up my only impression of sweet potato pie was this sickly sweet thing with marshmallows on top. No thank you!

But as I’ve discovered time and time again, when something is properly prepared it is delicious. Just because you didn’t like it the first time doesn’t mean won’t like it the next time.  So if you too grew up with that marshmallow concoction that was rather scary, give this a try. You’ll be delighted. It tastes like pumpkin pie, and who doesn’t like pumpkin pie?

I made mine mini since they were for a social event and it is much easier to eat mini pies than try and slice out pieces. Takes a bit more time but they are super cute! If you have no need to make mini ones a big pie will be just as tasty.

Mini Sweet Potato Buttermilk Pie

Adapted from Smitten Kitchen

One year ago: Peanut butter blondies with chocolate and sea salt

Yield: One 9 inch pie or about 20 mini pies

Difficulty: Easy

Time: Filling batter 10 minutes if using canned puree; Dough 10 minutes plus chill time; Rolling out dough will depend on whether you are doing mini or full pie

Ingredients

  • 1 1/2 pounds sweet potatoes (about 2 medium potatoes), peeled and chopped into a 1/2-inch dice*
  • 4 tablespoons unsalted butter, melted
  • 2 tablespoons fresh lemon juice (optional)
  • 1/2 teaspoon freshly grated nutmeg
  • 1/2 teaspoon ground cinnamon
  • 1/2 teaspoon kosher salt
  • 3 large eggs, separated
  • 1/2 cup brown sugar
  • 2 tablespoons all-purpose flour
  • 3/4 cup full- or low fat buttermilk*
  • Pie dough

Notes: I used canned organic sweet potato puree, because, well, I had it sitting in my pantry. It worked just fine and sped up the process if you are in a hurry. If you don’t have buttermilk on hand (and really, who does?) make your own by adding 1 TB vinegar to 1 cup milk. Let sit at room temperature until curdled, about 5 to 10 minutes.

Directions

1. Prepare your pie dough. Preheat oven to 350F. If making a full pie, roll out the dough large enough to fit your pie pan and press gently into pie pan. Blind bake (cover dough with foil and fill with dried beans or pie weights) for 10 minutes or until just barely golden. If making mini pies, I used a 4 inch cookie cutter and a muffin tin. You will have to re-roll scraps several times. Chill dough again if it becomes too tough to handle. I did not use weights when blind baking but just pushed it back down after baking. Let cool completely while you prepare your filling.

2. Preheat the oven to 375°F.

3. Pour 1 1/2 inches of water into a 3-quart stock part with a strainer basket suspended over it and bring to a boil over medium-high heat. Add the sweet potatoes, cover and steam until fork-tender, about 20 minutes. Place the steamed sweet potatoes in a large bowl and let cool to room temperature. Mash them into a smooth puree with a food mill. You should have 1 1/4 cups puree; discard any excess. Or just open a can of sweet potato puree and measure out 1 1/4 cups into your mixer bowl. Add the butter, lemon juice if using, nutmeg, cinnamon and salt and mix on low speed until thoroughly combined.

4. In a small bowl, beat the egg yolks lightly with a whisk, about 30 seconds. Add the sugar and beat until they’re a creamy lemon-yellow color, about 1 1/2 minutes. Add the egg mixture to the sweet potato mixture and stir until the eggs are thoroughly incorporated and the filling is a consistent bright orange color. Add the flour a little at a time, stirring after each addition until thoroughly incorporated. Add the buttermilk and again stir until smooth and even.

5. With a cleaned whisk (or electric hand mixer), whisk the egg whites to soft peaks in a clean, dry bowl. With a rubber spatula, gently fold the egg whites into the sweet potato-buttermilk mixture until thoroughly combined. Pour the mixture into the prebaked crust and bake on the middle rack of the oven until the center is firm and set, 35 to 40 minutes. If making mini pies, bake about 20 minutes until center springs back when touched.

6. Remove the pie from the oven and cool completely on a rack. Serve at room temperature (or cold from the fridge; you can cover it with plastic wrap before chilling) with a dollop of whipped cream. Enjoy!

4 Comments

Filed under baking, Pie

Day 3 of Baker’s Dozen: Peanut Brittle

Peanut brittle is a treat I’ve never been interested in before. I like peanuts, I don’t love them. And brittle just has never been something I’ve wanted to try. I’m not even sure when I last tried brittle, but it wasn’t memorable. It just always seemed to be shards of glass with peanuts in it. A little too brittle for my liking.

As usual, homemade makes everything taste better. Because I am officially addicted to this brittle. All day long “just one more bite.” Thank goodness my hubby has hungry co-workers who are willing to eat all of my experiments!

I got the recipe from Smitten Kitchen. She just doesn’t fail me. I even have a little crush on her blog. But ssh…don’t tell.

It’s easy to make. It really is. No thermometer required, although, I admit that did make me nervous! But it worked out just deliciously. I was short 2 oz of peanuts, but I’m glad I was. The amount I used was perfect. It takes a while for the sugar to cook, but you can do other things, like the dishes. Because with all this baking, there’s a lot of dirty dishes left over.

On a slightly separate note….have you ever wondered why it is a called a “Baker’s Dozen” and why that number is 13? According to Wikipedia, back in the day bakers could be punished severely if they shortchanged someone, even if it was accidental. So, they started giving people 13 items to make sure they were short. Another possible explanation is that 13 round items (e.g. biscuits) fit proportionality on a rectangular baking sheet.  And that’s your random history for the day.

Peanut Brittle

Yield: Just under half sheet pan

Difficulty: Easy

Prep time: About 30 minutes

Adapted from Smitten Kitchen

  • Vegetable-oil spray or 1 teaspoon butter, for lining the tray
  • 2 cups sugar
  • 4 ounces (1 stick) unsalted butter
  • 1/3 cup light corn syrup
  • 1/2 cup + 2 TB water
  • 1/2 teaspoon baking soda
  • 2 teaspoons to 1 1/2 tablespoons coarse or flaky sea salt
  • 10 ounces salted, roasted nuts, not chopped

1. Line a half sheet baking pan with parchment paper, or silpat, and lightly coat it with vegetable spray or butter. Lightly spray a spatula and set aside. Measure your peanuts, salt, and baking soda separately and set aside.

2. Put the sugar, butter, corn syrup, and 1/2 cup plus 2 tablespoons water to a large saucepan, and stir together until all the sugar is wet. Cook over high medium-high, but watch it carefully as it will foam up. Once it does, dial back to medium.

3. Once the mixture turns a medium golden (took about 20 minutes for me) immediately remove from the heat, and carefully whisk in the baking soda followed by the salt (taking care, as the caramel will rise in the pan and bubble some more). Switch to a wooden or metal spoon, and fold in the nuts. (Do not forget to switch or the nuts will get stuck in your whisk. Not fun!)

4. Quickly pour the mixture onto the sheet pan, and spread it out over the pan using the back of your greased spatula before it starts to harden. Alternately, you can slide the parchment paper out of the baking pan and onto a counter, cover it with another sheet, and use a rolling pin, pressing down hard, to roll it out as flat and thin as you would like.

5. At this point you can either let it cool completely (pulling off the top sheet of parchment, if you use the rolling pin technique) and break it into bite-size pieces. Or you can do as Smitten did and while it is still warm, cut into strips.

6. The brittle can be stored at room temperature, in an airtight container, for up to two weeks. Separate layers with parchment or wax paper. No way will it last that long though.

Enjoy!

3 Comments

Filed under candy

Peanut Butter Blondies with Chocolate and Sea Salt – Football Food!

Today marks the first day of my favorite time of year – football season, which goes until the end of the holidays. I rarely  sit down to actually watch a game, but there is something I love about having it on in the background and my dear hubby enjoying watching his Alma Matter play their hearts out. The weather is starting to cool off, soon the leaves will be turning…it’s the best time of year!

And with football comes football food! I technically made these for a BBQ the day before, but they’d be great for game day. At a BBQ or any similar event you really need a food that is easy to pick up, no utensils needed. Smitten Kitchen saved the day yet again with these fabulous Peanut Butter Blondies with Chocolate Ganache.They are very easy and very addictive. Well, addictive if your favorite combination in the whole wide world is peanut butter and chocolate. And mine is. I hope yours is too.

The batter takes about 10 minutes to make, including gathering up your ingredients (remember, I am slow with this part). It looks just like cookie dough, and I think you could probably actually drop these and make cookies instead.

Then you bake anywhere from 35 to 45 minutes, depending on how you like your edges and how hot your oven is. After it cools completely, make the ganache. If you live in the Oven, aka the South, like me, you might want to put the blondies int he refrigerator to chill, otherwise you’ll be waiting all night. I needed to sleep, so that was not an option.

Pour the ganache on top, sprinkle with sea salt if you so desire. I think it would also be very tasty with some pretzels crushed on top for some added texture and that salty sweet taste. And would also make it more manly than “sea salt”.

And try very hard not to eat them all at once. Thankfully I gave most of mine away and am only left with a few little pieces.  Enjoy, and Go Team!

Peanut Butter Blondies with Chocolate Ganache

Courtesy of Smitten Kitchen

Blondies

  • 2 sticks (1/2 pound) unsalted butter, softened
  • 1 3/4 cups sugar
  • 1 cup creamy peanut butter (I used all natural, fresh ground, honey roasted from Earth Fare)
  • 2 large eggs plus 1 large yolk
  • 2 teaspoons pure vanilla extract
  • 2 cups all-purpose flour
  • 1 1/2 cups semisweet chocolate chips (9 ounces)
  • 1/2 teaspoon salt, see note**

Preheat oven to 350 degrees F with rack in middle. Butter a 13- by 9- by 2-inch baking pan, then line bottom of pan with parchment paper and butter parchment.

Beat together butter, sugar, and vanilla with an electric mixer at medium-high speed until mixture is light and fluffy, about five minutes. Then add peanut butter and beat until incorporated. Beat in whole eggs and egg yolk.

Reduce mixer sped to low, then mix in flour until almost combined. Add in chocolate chips and beat on low until combined. Batter will be very thick!

Bake until blondies are deep golden, puffed on top and a wooden pick inserted in center come out with some crumbs, about 35 to 45 minutes.

Cool completely in pan on a rack, about 1 1/2 hours. Chill if needed.

Ganache
1 1/2 cups semisweet chocolate chips (9 ounces)**
1/2 cup heavy cream
1 tablespoon unsalted butter, softened

*1 1/2 tsp of coarse sea salt for topping

Put chocolate chips  in a heatproof bowl.

Bring cream to a boil in a small saucepan, then pour over chocolate chips and let mixture stand for one minute. Mix with a whisk starting slowly in small circles in the center, slowly working your way out as the chocolate and cream combine.

Gently whisk in butter until it is incorporated, chocolate is melted, and a smooth mixture forms.

Spread ganache on cooled brownies. Sprinkle with sea salt (or pretzels, or nothing at all). Let cool until set. This may take a while if it is hot and humid out, possibly overnight. Chill for a short while (30 minutes tops) if you need to speed things up. Ganache is best at room temperature though.

Slice and enjoy!

7 Comments

Filed under brownies

Homemade Oreos. Yep, just like the real thing. Only better.

My dear friend challenged us to make homemade oreos. I was worried it couldn’t be done. It couldn’t just taste like an oreo, it had to have the same texture as well. Crunchy cookie, sweet center.

So I set about searching that big internet for oreo recipes.  I found there are two that are most common. This one from Smitten Kitchen and one that is apparently from Thomas Keller. I knew the one from Smitten would be delish, her blog never fails me, but the cookie was chewy. That wasn’t what I was looking for. And the filling had shortening. I despise shortening! So, I went with the Thomas Keller recipe. I was a bit unsure of the filling, since it was basically a white chocolate ganache. That didn’t sound too oreo-y to me, but hey, it might be good, right?

It was good, but it was no oreo. This is the recipe that you will find all over right now claiming to be just like the real thing. It sort of is, but the filling is very obviously not an oreo.  If you don’t like white chocolate, you won’t like this.

The reject cookie. Notice the off-white center? But, we couldn’t let them go to waste and had to eat them.

The cookie part is dead on. If you have the secret ingredient that is: Black Cocoa. That wasn’t in the original recipe but I happened to have some since I like to try new ingredients from KAF.  If you are curious about the differences in all these cocoas, check out this link from David Lebovitz. If you can’t get KAF’s Black Cocoa, try Hershey’s Special Dark.

Back to the cookies. The cookie part is perfect. The filing was not. So I ventured back to Smitten’s filling, still cringing at the thought of using shortening, but at the same time realizing butter would leave me with melting cookies (insert very large sigh here). I headed to Earth Fare and saw they sold Organic Shortening, with just one ingredient, Palm Oil. Ok, still not the greatest ingredient, but in the name of Oreos, sacrifices must be made! And it worked. The filling tasted just like an Oreo.

The “sort of” healthier shortening. 

Now for the semi-bad news: the cookies aren’t exactly quick and easy to make. Ok, the dough is easy, but you will work up a bit of a sweat rolling these thin. But again, in the name of Oreos, sacrifices. Enjoy making this special treat, and don’t forget the milk.

Chocolate Wafer Cookie (Adapted from here)

  • 1 1/2 cups + 3 TB AP Flour
  • 3/4 cup sugar + 1 TB
  • 1/2 cup Dutch process cocoa powder
  • 1/4 cup + 1 TB Black cocoa powder
  • 1/2 tsp baking soda
  • 1 1/2 tsp salt
  • 15 TB unsalted butter, cubed, and chilled

Preheat oven to 350F.

Combine the flour, sugar, cocoa powders, baking soda, and salt in a mixer. On low, add the butter a few pieces at a time. Mix until dough comes together. This will take a long time, around 10 minutes. You will think you did something wrong, but just wait, it will happen!

Form dough into a ball and divide in half. Chill. Once chilled, take half out at a time and roll to 1/8″ if you can, I had trouble with that thin and did 1/4″. It made my life easier and the cookie still turned out great.

Using a cookie cutter that is under 2″ (or bigger, it’s up to you), cut out cookies and place on baking sheet. Bake until done, about 8 to 10 minutes depending on your oven and the size of your cookie.

Let cool completely before filling.

Filling from Smitten

  • 1/2 stick room temp butter
  • 1/4 cup shortening
  • 2 cups sifted confectioners sugar
  • 2 tsp vanilla

Beat until light and fluffy, which will take some effort. It will be very dry and you will again think you’ve done something wrong. Fear not, it will happen and you will soon be eating cookies that taste like oreos, but are so much better.

Take the filling and put into a piping bag (or a plastic baggie) and pipe a small amount of filling onto half the cookies. The filling is stiff, so prepare to use those muscles again. The press another cookie on top and there you have it. Oreos.


25 Comments

Filed under Cookies

Leaning Tower of Red Velvet Cake

I thought I’d share my “oops” cake with you. As you may remember, I made Chocolate Soufles the weekend before Valentines Day since it fell on a Monday this year. While I was out for a run on the afternoon of Valentines Day, I was thinking about cake. Yes, I think about food constantly while I run. After all, I run so I can eat more. Oh, and yeah, that being “running is good for me” stuff too. Anyhow, I thought my dear hubby would really appreciate a red velvet cake on V-day. It is his favorite and I figured I probably had time to make a small cake and surprise him. There would be no time for fancy stuff, just a cake. I used the same recipe from Smitten Kitchen but cut the cake recipe in half for a six inch cake and used the full icing recipe.

This is what happened:

red velvet cake

I took a teeny tiny short cut. Some of the cake stuck to the pan and instead of patching it up or at least trimming the cake, I just tried to fill it in with more icing. And the cake started leaning! I tried to get it to stay upright but it was too late at that point.  It’s pretty funny, don’t you think? Thank goodness it was just for the two of us, and even more thankfully, it was DELICIOUS. My best tasting red velvet yet, I kid you not! It was so incredibly moist and yummy, I’m actually sad right now that it is long gone.

But this was a good lesson for me. One, minor patches on cake are a good thing, time permitting. And two, a less than perfect appearance does not mean less than perfect taste. Apparently I don’t always have to be a perfectionist to make good food. Lesson learned.


Leave a comment

Filed under Uncategorized

Chocolate, Caramel, and Coffee. Cupcakes, that is.

Yes, this post is about all three – chocolate, coffee, and caramel. Three of my most favorite indulgences, all in one beautiful little cupcake. Last week I was requested, er, told, that I was to bring the dessert for a work pot luck.  I love making a dessert that makes people smile, so I needed something good. Really good. And I’m afraid I’ve outdone myself this time. I don’t know how I will ever make anything better. I’m a serious critic of my food, and this time, I am really proud.

What could I have made that tastes so good? Chocolate cupcakes with caramel pudding and a coffee buttercream icing. Oh yeah. When people ate these they had a look of pure pleasure on their face. That amazing.

And then, at the same time, I thought, Do I really want to share these? Maybe I should just buy cupcakes so I can keep these to myself. I got the cake recipe from Smitten Kitchen and she too writes that she didn’t want to share. In fact, she said “I kind of wanted to swat people off with a spoon.” I felt the same way! You will too. I promise.

Now these cupcakes didn’t come without heartache. I knew I wanted to put caramel pudding inside, but I had never made caramel pudding before. I’ve made pastry cream many times, but never caramel flavored. The first recipe I tried came out rubbery. I was worried because it didn’t have eggs like the traditional pastry cream. I was right to be worried. It was terrible. Bleh. Try number two I used a recipe from Hungry Cravings and I was fairly certain this recipe would work since it was a traditional pastry cream recipe. But, the first time I burned my sugar. Like black in my pan. Bad. Just a pointer if you do this, fill your pot of burned, hard sugar with water and bring to a boil. It will dissolve the sugar and then your pot will be clean! Second time though, the sugar didn’t burn and I had a delicious caramel pudding. Whew. Step one was done.

The pudding after chilling. Looks weird, huh? Stir first!

The cake went fairly smoothly, except I overfilled the cupcakes. I knew the cake didn’t rise a lot, but I still over judged how much to fill. So I had to very carefully peel each cupcake from the pan. If I wasn’t careful, I would tear the cupcake and it wouldn’t be pretty anymore.  And those “ruined” cupcakes, well, quality control is just terrible, huh? I couldn’t let them go to waste. Yummy.

Finally, the buttercream. I’m not sure why buttercream gives me such a headache, but alas, it does. I learned a very important lesson when I made this buttercream. My emulsion broke. Let’s chat a bit about emulsions. According to wikipedia an emulsion “is a mixture of two or more immiscible (unblendable) liquids.” What, that doesn’t make sense? Yeah, I didn’t think so either. Examples of emulsions are mayonnaise and vinaigrettes. Mayo is a “permanent” emulsion. Once it is done, it’s done and it won’t separate if it’s done correctly. Vinaigrettes will have to be mixed each time since they will separate. An emulsion forms when the mixture is well, mixed properly. It is broken when it’s not. And you know when it’s broken because it just looks terrible.

Now, did you know that ganache and buttercreams are also emulsions? Yup, they are. This buttercream was made with egg whites, sugar, and butter. All was going well with the egg whites, but when I started adding the butter, I had a grainy, icky, horrible looking buttercream.

Egg whites whipped to stiff peaks.

Broken buttercream. Ugly, yucky, disappointing.

Drat. What to do? I didn’t want to dump it out and start over – what a waste! Thankfully, Baking 911 had pointers for fixing a broken butter cream. The site suggested if it is cold and broken, melt about 25% of the butter cream and rewhip. This didn’t work for me the first time. I tried chilling in the refrigerator and then whipping. Nothing, nada, zip. I was on the verge of a meltdown at this point. Why wasn’t it coming together? So, one more shot. I put the buttercream in the freezer for 15 minutes, then melted some again. I was so certain it wasn’t going to work that I just put the mixer on high speed, insanely fast, and what do you know – I had a smooth, silky butter cream. I did a little jump for joy! Yahoo!

Then, it was time to assemble. This was the easiest part. Step 1, cut out little holes in your cupcakes.

Cupcakes with holes.

Place all your cake crumbs into a separate bowl. Save for later when you are craving this cake. This may be immediately.

Mmmm….snack.

Next step is to fill the cupcakes. The absolute, easiest way to do this is use a piping bag. There is no reason to be scared of a piping bag here. It requires no skill whatsoever. You are merely filling the cupcakes and it will make your life a whole lot easier if you use a piping bag. If you don’t have one, they are super cheap at your local craft store (particularly if you use coupons!). I prefer the 14″ Wilton Featherweight bags because they are dishwasher safe (hooray!) and just the right size. And, all you need is a simple piping tip like this one and you are set. No need for couplers here since you are using a larger tip and you are just filling cupcakes.

Finally, time to top the cupcakes with that buttercream. I used a piping bag here too, but it isn’t necessary. Do whatever is easiest for you.

Heavenly. Oh, so good.

People will love you for these. If you are willing to share, that is. And if you aren’t, don’t worry, I understand. They are that good.

Caramel Pudding

from Hungry Cravings

I only used about half of this in the cupcakes. So, either cut the recipe in half or enjoy the rest as tasty snack.

  • 6 ounces sugar
  • ¼ cup water
  • 2 cups milk
  • 1 ¼ ounce cornstarch
  • 1 large egg
  • 2 large egg yolks
  • ½ ounce unsalted butter
  • 1 teaspoon vanilla extract

Combine 5 ounces of the sugar and the water in a small, heavy saucepan. Bring to a boil, brush down the sides of the pan with water, and boil for 8 to 10 minutes, or until caramelized (this only took about 5 minutes for me. The key is to watch very carefully! Do not leave the room!) The sugar will be fragrant and a deep amber color when it is caramelized. Remove the pan from the heat and dip the bottom into an ice water bath for a second or two. Slowly stir in the milk. (The sugar may harden at this point. Just keep stirring on the heat and it will melt again).  Return the pan to low heat and stir until smooth. Increase the heat to medium and heat to a simmer.

Meanwhile, whisk together the cornstarch and remaining 1 ounce of sugar in a medium bowl. Whisk in the egg and yolks. Continue whisking while adding the hot caramel mixture (all of it, not just a little) in a thin stream. Transfer the mixture back to the saucepan and cook, whisking constantly, over medium heat for 2 to 3 minutes, or until it thickens and just comes to a boil. Immediately strain through a fine mesh sieve into a clean bowl and stir in the butter and vanilla. Press plastic wrap directly onto the surface and refrigerate.

Double Chocolate Cake

From Smitten Kitchen

The recipe below is for 2 10-inch layers or about 32 cupcakes.

  • 3 ounces fine-quality semisweet chocolate such as Guittard
  • 1 1/2 cups hot brewed coffee
  • 3 cups sugar
  • 2 1/2 cups all-purpose flour (I used half King Arthur Cake Flour and half AP flour)
  • 1 1/2 cups unsweetened cocoa powder (not Dutch process)
  • 2 teaspoons baking soda
  • 3/4 teaspoon baking powder
  • 1 1/4 teaspoons salt
  • 3 large eggs
  • 3/4 cup vegetable oil
  • 1 1/2 cups well-shaken buttermilk
  • 3/4 teaspoon vanilla

Preheat oven to 300°F. and prepare pans or cupcake liners.

Finely chop chocolate and in a bowl combine with hot coffee. Let mixture stand, stirring occasionally, until chocolate is melted and mixture is smooth.

Into a large bowl sift together sugar, flour, cocoa powder, baking soda, baking powder, and salt. In another large bowl with an electric mixer beat eggs until thickened slightly and lemon colored (about 3 minutes with a standing mixer or 5 minutes with a hand-held mixer). Slowly add oil, buttermilk, vanilla, and melted chocolate mixture to eggs, beating until combined well. Add sugar mixture and beat on medium speed until just combined well.

Note: This is a very runny cake mixture. You will think you’ve done something wrong, but never fear, it is supposed to be like that.

Divide batter between pans and bake in middle of oven until a tester inserted in center comes out clean, 1 hour to 1 hour and 10 minutes.

Cool layers completely in pans on racks. Run a thin knife around edges of pans and invert layers onto racks. Carefully remove wax paper and cool layers completely. Cake layers may be made 1 day ahead and kept, wrapped well in plastic wrap, at room temperature.

Coffee Buttercream

from Martha Stewart

I doubled this recipe and had just a little bit leftover.

  • 1 tablespoon instant espresso powder
  • 1 tablespoon boiling water
  • 3/4 cup sugar
  • 3 large egg whites
  • 2 sticks unsalted butter, room temperature, cut into tablespoons
  • 1/2 teaspoon pure vanilla extract

Place espresso powder in a small cup; add the boiling water, and stir to dissolve. Let cool.

Bring a saucepan with about 2 inches of water to a simmer. Combine sugar and whites in a large heatproof mixer bowl set over (not in) simmering water. Whisk until whites are warm to the touch and sugar is dissolved, 2 to 3 minutes.

Place bowl on mixer stand; whisk on low speed until mixture is foamy. Whisk on medium-high until stiff, glossy peaks form and mixture is completely cooled completely, about 10 minutes.

Reduce speed to medium-low; add butter 2 tablespoons at a time, whisking to incorporate fully well after each addition (if buttercream appears curdled, at this point simply beat until smooth). Whisk in vanilla and espresso mixture.

Switch to paddle attachment; beat on lowest speed to reduce air bubbles, 3 to 5 minutes. To store, refrigerate airtight up to 3 days, or freeze up to 1 month. Before using, bring to room temperature; beat with paddle attachment on the lowest speed until smooth and pliable, about 10 minutes.

2 Comments

Filed under cake

Red Velvet Cake

Cake is not one of my favorite things to make. I much prefer cupcakes.  I stress and stress about making a perfect cake every time.  Considering I only make full cakes a handful of times of year, it’s probably unreasonable to expect perfection each time.  But each time I do, and each time I disappoint myself with my errors. Of course, most people will not notice the little imperfections that us perfectionists notice. They will notice a delicious, homemade cake. And that’s what matters.

Red Velvet is the one cake I’ve struggled with not just on the decorating side (that’s with all cakes) but with the cake itself. But as they say, practice makes perfect and I’ve certainly had my fair share of practice with this cake!

The first time I made red velvet it was brown (I ran out of food coloring), dry, and really not all that great. The second time I used a different recipe. Again, it came out average. The third recipe I tried was Smitten Kitchen and finally felt I was on to something. The first time I did this recipe though, it didn’t turn out perfect, mostly because I strayed from the recipe! Tsk, tsk! I try not to do that the first time using a recipe, and I did and suffered! It seemed so minute, how could it cause me problems? She clearly states “1 tsp red gel coloring dissolved in 6 TB of water.” Instead, I simply dumped gel food coloring into the cake until it was my desired color. I think that affected the end result. Maybe not the only thing, but the second time I made the cake I dissolved the gel and the color was not only better, but the cake was better! Who knew?

Finally, the third time, this most recent, the cake turned out so wonderful. Yes, my piping was just average. But the cake, oh my god. So yummy. This time I used King Arthur Unbleached Cake Flour. I love this flour! Thankfully, it is now sold at Publix. And, it isn’t bleached. I still don’t understand the need for bleaching flour. Extra chemicals? No thanks. But this flour was soft and delicate, and I’m certain it contributed to the wonderful, moist cake. Did I mention how good this cake was? I wish there was some left.

As noted, you should use non-dutch process cocoa powder. I have tried dutch process and it doesn’t work well. If you aren’t sure if it is dutch process, just look at the ingredient list. Straight cocoa will just say cocoa. If it says anything else, it is dutch process. Also, DON’T forget to sift your cocoa powder! For most everything else you can get by with just whisking but with cocoa powder you are almost guaranteed to have lumps! Lumpy cakes are no good!

The pictures aren’t great for this post, but well, we were busy devouring the cake. We had a lot to celebrate! I’m sure you understand.

I followed Smitten Kitchen’s recipe exactly, except I made two 10 inch cakes instead of three nine, and I added the flour/buttermilk in three batches instead of two.  I also used her cream cheese icing but modified it slightly. I tripled it (yes, triple. I like my icing) and used one part mascarone and two parts cream cheese.

As you may notice in the first picture, I did multiple layers. The easiest way to do this is to use cake boards and a turn table, both of which can be bought for relatively cheap at your local craft store, particularly if they offer coupons! Second, you should use a serrated knife. Make small sawing motions while turning the cake and slowly work your way through the whole layer. Do not do this in large motions – it won’t work as well. Once you are done, use a cake board to help flip the layer you won’t be using right away. Load up on the icing, then top again with the layer. Repeat.

Before doing the crumb coat, you may want to take your knife around the entire cake and even it out. This is easy, only takes a second, and will really improve the appearance of your cake. Also, if you are really a perfectionist like me, you will also level out the top since cakes often bake with that “bump”. Then, you can enjoy the crumbs! After the cake is all level, do a thin layer of icing and chill for about 30 minutes. Then put another layer until the desired thickness. Smooth the icing and you have a beautiful cake!

Red Velvet Cake with Cream Cheese Icing from Smitten Kitchen

Red Velvet Cake

Yield: 3 cake layers

1 tablespoon unsalted butter
3 1/2 cups cake flour
1/2 cup unsweetened cocoa (not Dutch process)
1 1/2 teaspoons salt
2 cups canola oil
2 1/4 cups granulate (room temperature)
6 tablespoons (3 ounces) red food coloring or 1 teaspoon red gel food coloring dissolved in 6 tablespoons of water
1 1/2 teaspoons vanilla
1 1/4 cup buttermilk (room temperature)
2 teaspoons baking soda
2 1/2 teaspoons white vinegar.

1. Preheat oven to 350 degrees. Place teaspoon of butter in each of 3 round 9-inch layer cake pans and place pans in oven for a few minutes until butter melts. Remove pans from oven, brush interior bottom and sides of each with butter and line bottoms with parchment.

2. Whisk cake flour, cocoa and salt in a bowl. Be sure to sift your cocoa powder first!!

3. Place oil and sugar in bowl of an electric mixer and beat at medium speed until well-blended. Beat in eggs one at a time. With machine on low, very slowly add red food coloring. (Take care: it may splash.) Add vanilla. Add flour mixture alternately with buttermilk in three batches. Scrape down bowl and beat just long enough to combine. Always end with the flour mixture.

4. Place baking soda in a small dish, stir in vinegar and add to batter with machine running. Beat for 10 seconds.

5. Divide batter among pans, place in oven and bake until a cake tester comes out clean, 40 to 45 minutes. Let cool in pans 20 minutes. Then remove from pans, flip layers over and peel off parchment. Cool completely before frosting.

Cupcake variation: The yield is approximately 35 cupcakes, with the liners filled only 3/4 of the way, and the baking time should be between 20 to 25 minutes, but check in on them 2/3 of the way through in case your oven gets the job done faster.

10 inch cake variation: I figured it would take longer to bake 10 inch cakes, but it didn’t. They only took about 30 minutes, but this could just be my oven. The lesson here: keep a close eye on your cakes! Another way to tell if your cakes are done is when they pull away from the side of the pan.

Cream Cheese Icing

Adapted from several sources

Makes 6 cups

8 ounces cream cheese, room temperature
1/2 cup (1 stick) butter room temperature
3 cups confectioner’s sugar, sifted
1 teaspoon pure vanilla extract

Place cream cheese and butter in a medium bowl. With a handheld electric mixer, beat until light and fluffy, about 2 minutes. Add sugar and vanilla. Beat, on low speed to combine. If too soft, chill until slightly stiff, about 10 minutes, before using.

Note: as mentioned, I made this recipe times three, and used eight ounces mascarpone and 16 ounces cream cheese. I like the texture the mascarpone provides.


1 Comment

Filed under cake