Tag Archives: chocolate

Baby Shower Cupcakes and Tips for Working with Fondant

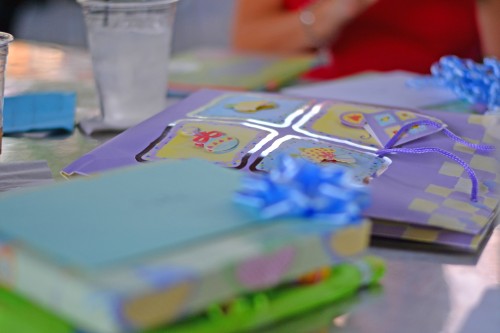
I have a monthly, uh, book club, if you can call it that (I’m not sure we even talked about the book last month) and right now two of our regulars are knocked up with sure to be adorable baby boys. So of course we had to do a book club themed shower, right? Right. We kept it simple. Still met at our normal book club meeting time, had planned on talking about the book, but instead had cupcakes and for gifts everyone brought books for the baby. These little boys are off to a great book collection already!

Baby showers are all about Cute and Tiny. Because that’s what a baby is, right? Thus, all coordinating baby shower items must be cute and tiny and I knew I had to make book toppers for the cupcakes. I must confess that these books did not turn out at all the way I wanted. I got all big headed and assumed I’d be perfect at making these because I’ve worked fondant before. Over two years ago. So yeah, I struggled a bit. But they still turned out pretty cute, all things considered.

Making the books are actually pretty easy once you get the hang of it. I decided how big I wanted them to be (about 1 1/2 inches) and then doubled that and added a bit since you will be folding them over. Then for the middle I just guessed to make the pages. Just cut out a piece that fits nicely in the book. It may take a couple of tries. I used a tiny dab of water and powdered sugar to help it stick to the center. To make it more book like I used an edible marker for the “ABC” and then used a paring knife to make indentations on the side and on the “pages”. Once you get your first one done the way you like it, use it as a template to cut out the others. I just used a pizza cutter and a ruler!

Let’s talk about the Don’ts I learned from this experience.

1. Do not use the Wilton Spray Food Color. Never. Ever. It’s terrible and I was cleaning up blue for the next week. And it doesn’t stick to fondant very well. It might work fine and dandy with regular icing but not fondant. I grabbed it to save time. Bad idea.

2. Do not assume that Wilton “Rolled Fondant” is all rolled and ready to go with no kneading required. It still needs kneading and rolling it out thin is still tough work. I also grabbed this to save time. Bad idea number 2.

3. Don’t expect to be perfect the first time.

Dos:

1. Do experiment a few times to get the hang of it.

2. Keep your fondant covered with a damp paper towel or it will dry out and make it difficult to work with. And you will end up frustrated.

3. Knead in your food coloring. It will only take a couple of drops. You can always add more if you need to adjust your color.

The spray color was simply a mess to work with! 

After I got started, making these were pretty easy. They would have been easier if I hadn’t done Mistakes 1 and 2. As for the cupcakes, I just used my favorite chocolate cake recipe. The buttercream was a simple buttercream. I actually don’t like simple buttercream and scrape it off my cupcake. However, I needed an icing that would hold up to warm, humid temperatures and this one does beautifully. And this cake doesn’t need a buttercream but the book needed to sit on something!

What cute baby shower ideas have you seen?

5 Comments

Filed under baking, cake

Boozy Biscotti

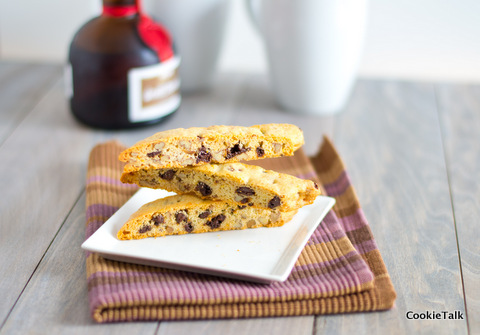
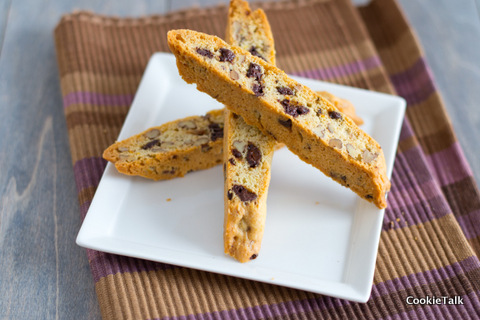
The title may be a wee bit deceiving. Yes, these biscotti have booze in them, but not enough to really call them boozy. But it got your attention, didn’t? Yup, thought so!

You have probably figured out by now that I like biscotti, considering this is my third biscotti post (check out the others here and here). I find it hard not to like biscotti. It’s sweet, but not too sweet, crunchy, and goes so perfectly with that morning cup of coffee. I’m a sucker for anything that goes well with coffee (as well as anything that goes well with wine, but that’s another story for another day).

This recipe just took front and center as my favorite. And I found that they held up better than other biscotti when slicing. Of course, that could be attributed to my finally being patient enough to let the biscotti cool sufficiently before slicing. In the past I tried to rush (I know, I know) and sliced too soon, resulting in crumbly slices. (Sheepishly hangs head).

Another reason I like these so much is because orange and chocolate go splendidly together. I’ve always thought it a strange combination but darn is it tasty! I used Grand Marnier, but feel free to use OJ or another orange liqueur.  The recipe is as easy as any other cookie recipe. Would be perfect to take to work, or obviously, a coffee with the girls.

Chocolate Orange Biscotti

Adapted from Bon Appetit Desserts

One year ago: Cheesecake Deconstructed

Yield: About 3 dozen

Difficulty: Easy

Time: 10 minutes or less to prepare; 20 minutes to chill; 1 hour total to bake, plus 20 minutes to rest in between

Ingredients

  • 2 cups plus 2 TB unbleached AP flour
  • 1 1/2 tsp baking powder
  • 1/4 tsp salt
  • 3/4 cup sugar
  • 1/2 cup (1 stick) butter
  • 2 TB Grand Marnier
  • 1 TB orange zest (don’t skip this or you won’t get that orange-y flavor)
  • 2 large eggs
  • 1 cup pecans, toasted and chopped
  • 6 oz bittersweet or semisweet chocolate, chopped or use chips

Directions

1. Line two sheet pans with parchment or silpat.

2. Whisk together flour, baking powder, and salt in a bowl. Set aside.

3. Using an electric mixer, cream together the butter, sugar, zest, and Grand Marnier until light and fluffy, 3 to 4 minutes. Beat in eggs one at a time, blending completely after each addition.

4. Reduce speed to low and add flour mixture. Mix until almost combined and then add the pecans and chocolate. Mix until just combined.

5. Gather dough into two balls, wrap in plastic and freeze for 20 minutes.

6. While dough is chilling, preheat your oven to 350F.

7. After dough is chilled, place each piece on prepared sheet pan. Roll (or pat) into a long log, about 14 inches long and 2 inches wide. Bake until barely golden, about 30 minutes.

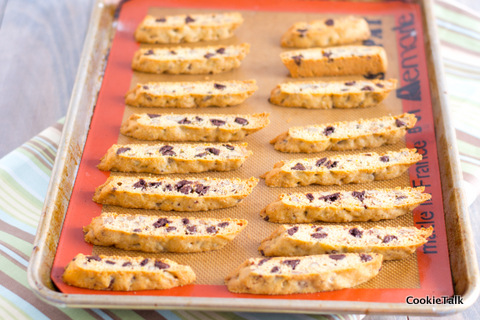
8. Remove from oven and place on racks to cool for 20 minutes. Carefully move the logs to a cutting board. Cut on a diagonal into 1/2 inch slices. Move pieces back to sheet pan, standing up right. Bake another 30 minutes, or until dry to the touch and golden. Cool completely before dunking in coffee.

9. Store in airtight container. They will keep for several days. Enjoy!

3 Comments

Filed under Cookies

Day 8 of Bakers Dozen: Peppermint Patties

Peppermint patties. People either love them or are indifferent to them. I’m in the latter category but my dear hubby has always loved them. He said he used to get them in his stocking at Christmas time. Mint has never been my favorite treat. I’m not one of those girls who’s favorite ice cream is “Mint Chocolate Chip” (it’s coffee, in case you were wondering) and Thin Mints from Girl Scouts were by far my least favorite (I’ll take a box of Tagalongs, please).

All that changes when something is fresh and homemade. I loved these peppermint patties. My husband loved them. My mom devoured them. And, they were easier to make than I expected. I thought I’d be pulling my hair out, but they weren’t hard at all to make. Time consuming, but not hard. And so worth it. Hubby did most of the chocolate dipping. He did a great job, don’t you think? It’s good to have a partner in crime in the kitchen!

This is my second batch. The first batch tasted great, but turned out less than photogenic. The second time around I froze the patties for several hours. It is much easier to dip if they are ice cold. I also added cocoa butter to make the chocolate mixture thinner which made for easier dipping. If you don’t have cocoa butter, you can try a tiny bit of vegetable oil. Or just skip it, but it will be thick and harder to dip.

Right now King Arthur Flour has $3 ground shipping so it is a great time to buy those hard to find items like cocoa butter (which will last for years!), black cocoa, and fiori di Sicilia. And don’t forget the sourdough starter! Merry Christmas to you, right?

Peppermint Patties

adapted from What Megan’s Making

Yield: 3 to 4 dozen

Difficulty: Easy to Medium

Prep time: About 1 hour, plus freezing time.

  • 2 1/4 cups powdered sugar
  • 1 1/2 TB light corn syrup
  • 1 1/2 TB water, plus more for spritzing if needed
  • 1/2 tsp pure peppermint extract
  • 1 TB shortening (preferably organic!)
  • confectioner’s sugar, for kneading and rolling – I used about 2 TB
  • 13 ounces 70%-cacao bittersweet chocolate, coarsely chopped
  • 1 TB cocoa butter, plus more if needed

1. Mix together the powdered sugar, corn syrup, water, peppermint extract, and shortening in a mixer. It will take a while to come together and will still only be crumbly. If it is very dry where you are, spritz lightly with a little extra water. Once you start seeing large pieces come together, it is ready. You should be able to form a ball and hold its shape.

2. Move mixture to workspace and knead lightly until smooth. You may need to spritz lightly with water. The first time I made these it was more humid out and the dough was easier to work with. It is a little more challenging when it is dry outside. Wrap in plastic and freeze for 15 minutes.

3. Roll dough until 1/8″ (or larger if you like thick patties). Dust with confectioners sugar as needed but try not to go overboard. It will make your dough dry. Return to freezer if dough becomes difficult to work with.

4. Cut into circles. I used a 1 1/2″ cookie cutter. You can use whatever you have. Even a shot glass would work. Place patties on a sheet pan. Re-roll scraps and cut again. Freeze patties for several hours or overnight.

5. When ready for dipping, prepare a double boiler by placing a heat proof bowl over a pan of simmering (not boiling!) water. Make sure the bowl does not touch the water!

6. Melt 9 ounces, or about 3/4ths, of your chocolate until smooth. Remove from heat and add remaining chocolate. Stir until smooth. Return to heat and add your cocoa butter. Add more if chocolate is too thick. Turn heat off but keep chocolate over the water to keep warm.

7. Using a fork, dip the peppermint patty quickly into the chocolate, covering completely and then shaking excess off. Use a knife to scrape patty off of fork back onto the sheet pan. Repeat until all patties are complete.

8. Leave at room temperature uncovered until completely set. Once set, you can cover them, but they may get spots so you are best just leaving at room temperature, preferably in a candy bowl where everyone can enjoy!

Leave a comment

Filed under candy

Day 6 of Baker’s Dozen: Candy Cane Bark.

Candy cane bark is everywhere these days, but, amazingly, I just had it for the first time last year. And of course, I love it. I love chocolate and I love candy canes. And this treat just screams “Happy Holidays!” don’t you think?

I know I’ve posted a lot of stuff that I’ve said is easy, and I promise all are, but this is one of the easier ones amongst the easy treats. You don’t even really need a recipe. Just melt some chocolate, add peppermint, add crushed candy canes and you are done! See, easy!

I accidentally made mine thinner than I had planned. Got a little carried away spreading out the chocolate. But, turns out, I like it better that way! It’s more delicate and more pleasant to eat than a thick chunk. I planned it that way…right…

This makes a pretty small amount, but is easy to double. Adjust the candy cane and peppermint extract to your liking.


Candy Cane Bark

Adapted loosely from King Arthur Flour

Yield: A couple of cups, depending on how thin your chocolate is

Difficulty: Easy!

Ingredients

  • 6 ounces chocolate, semi-sweet or dark (not chips)
  • 4 ounces white chocolate (not chips, preferably)
  • 2 to 3 candy canes, broken into pieces
  • 1/2 tsp peppermint extract

1. Chop both chocolates separately. Bring a pan of water to a simmer. Set up a double boiler: set a heat proof bowl over a pan of simmering water. Make sure the bowl does not touch the water. Line a half sheet pan with parchment or silpat and set aside.

2. Melt the semi-sweet or dark chocolate first. Spread onto sheet pan making chocolate as thin or thick as you desire. Set into refrigerator for about 5 minutes to help set. Don’t leave the chocolate in the refrigerator or it will make your chocolate spotty.

3. Meanwhile, melt your white chocolate. Add peppermint extract to white chocolate. Once chocolate is mostly set, spread white chocolate over the chocolate. If it isn’t set yet, you may have swirls, but it looks pretty, I think.

4. Spread candy cane over white chocolate before it sets and gently press candy into chocolate.

5. Let set at room temperature until firm. It was rainy when I made this, so it took awhile to set up. Don’t be surprised if it has to sit overnight. Once set, break into pieces and enjoy!

Leave a comment

Filed under candy

Day 2 of Bakers Dozen: Fudge

Fudge. And that’s all I need to say about this post.

Kidding. Sort of. I love fudge. Really love fudge. But only good fudge. The kind you can get at a really good chocolate store. Rich and creamy and melts in your mouth (not to be confused with that *candy* that melts in your mouth, supposedly). And when it comes to fudge, I am a purist. Just chocolate for me please. Sure, I’ll try the others, with nuts, egg nog, pumpkin, cookies. They are all fine. Even made peanut butter for this post since hubby loves peanut butter. But I just want to savor my chocolate fudge. That’s all I need.

And this was the first time I had made fudge the way it is supposed to be made. No marshmallow fluff. No condensed milk. I’ve made those versions before. They are quick and easy. But not the real thing.  And not nearly as tasty. I did the old fashioned way of cooking the chocolate mixture to 235F and then waiting. And waiting. And waiting for the full 24 hours for the chocolate to completely set so you can then start nibbling. One piece here, just one more there. Oh fudge.

My hubby also loves fudge as much as I do, but his love is split between chocolate and peanut butter. The peanut butter fudge turned out good, but not amazing. It was a bit dry (but got better as the days went on) and I think that was because I used fresh ground hippy, dippy, and trippy peanut butter instead of those awful brands Skippy, Jif, and whatever other company dares to call their “product” peanut butter. I’ll spare you the ingredient list this time, but those products have  who knows what else added to the peanut butter. The product I used just had peanut butter. It had great peanut butter taste, just was a bit dry.

The perk about this peanut butter fudge is that it is really  easy to make. I actually made the peanut butter fudge while waiting for the chocolate fudge to cook. Yup, that easy. Just melt the butter and peanut butter together, make a mess while adding powdered sugar, and voila! Peanut butter fudge!

Meanwhile, you’ll still be waiting for the chocolate fudge to rise to the proper temperature. It will be worth your wait. Might as well clean your kitchen, since if you are like me, you will have powered sugar everywhere.

And who doesn’t like to receive fudge as a gift, all wrapped up and pretty?  It’s a sweet gift and from the heart.

Both recipes came from Brown Eyed Baker, who subsequently got the recipes from Joy of Cooking, which, sadly, I do not own. It’s a classic and I should have it. Maybe for Christmas. Thanks, Brown Eyed Baker for the fudge inspiration!

Chocolate Fudge

Yield: About 64 1 inch pieces

Difficulty: Easy to Medium

Prep Time: 1 hour | Chill Time: 24 hours

Ingredients

2 cups granulated sugar
½ cup half-and-half
½ cup heavy cream
¼ cup light corn syrup
1/8 teaspoon salt
6 ounces bittersweet or semisweet chocolate, chopped
2 tablespoons unsalted butter, softened
1 teaspoon vanilla
1 cup walnuts, coarsely chopped (optional)

1. Line an 8-inch square baking pan with foil that extends over the sides. Butter the foil and set aside.

2. In a large saucepan, combine the sugar, half-and-half, heavy cream, light corn syrup and salt. Stir over low heat until the sugar is dissolved. Bring to a boil and cook, without stirring, for 1 minute. Brush down the sites of the pan with a pastry brush dipped in warm water to remove any sugar crystals that may have formed, and remove from the heat. (Do not do this repeatedly – you will be adding extra water if you do this over and over again. Just once is fine.)

3. Stir in the chocolate until melted and completely smooth. Set the pan over medium heat and place a candy thermometer in the pan. Cook the mixture, without stirring, until it reaches 238 degrees F, the soft-ball stage. Remove from the heat.

4. Add the butter and vanilla but just let float on top – do not stir in (stirring at this point can cause graininess).

5. Cool the candy to 110 degrees F by placing the bottom of the pan in cold water to stop the cooking. This will take awhile, especially since you can’t stir.

6. When it is cool, stir the fudge in the pan with a wooden spoon just until it “snaps” and begins to lose its sheen.You will notice that it will be really shiny, and then almost dull. That’s when you are done. (Alternately, transfer the cooled fudge to the bowl of a heavy duty mixer. Using the paddle attachment, beat the fudge on low speed until it begins to thicken and lose its sheen, 5 to 10 minutes. Watch the mixture carefully or it may thicken too much and become unworkable.)  I used my handheld KitchenAid mixer and it worked great…but…it has a very low speed 1. If your handheld does not have a low speed 1 (and many of the “bargain” ones don’t) I would not recommend this.

7. Stir in the walnuts if you are using them. Turn the fudge out into the prepared pan. Smooth the top with an offset spatula, moving quickly and keeping the spatula on the chocolate until you are done spreading. This will minimize the mess. Let stand for at least 1 hour.

8. Use a large knife to score the fudge into 1-inch squares (optional – it will still cut nicely when set) Cover and refrigerate at least 24 hours.

9. Remove the fudge from the pan and peel off the foil. Use the knife to finish cutting the fudge into squares. The fudge can be stored in an airtight container in the refrigerator for up to 3 weeks. It can also be stored at room temperature if it won’t last long. And it won’t. Serve at room temperature.

Peanut Butter Fudge

Yield: 64 1 in pieces (1½ pounds)

Prep Time: 10 minutes

Difficulty: Easy!

Ingredients

1¼ cups (10 ounces) unsalted butter
1¼ cups smooth peanut butter
Pinch of salt
1½ teaspoons vanilla extract
4½ cups powdered sugar, sifted

1. Butter an 8-inch non-stick baking dish (or line with buttered parchment paper) and set aside.

2. In a large saucepan over medium heat, heat the butter and peanut butter until the mixtures comes to a boil. Remove from the heat. (It will all fit in a medium saucepan, but using a large one will help minimize the powdered sugar mess.)

3. Add the salt and vanilla extract, then stir in the powdered sugar until smooth and no lumps remain.

4. Pour the fudge mixture into the prepared pan and smooth the top. Press a piece of plastic wrap directly on the fudge and refrigerate until set, at least 1 hour. Cut into squares and serve. Fudge can be stored at cool room temperature in an airtight container.

1 Comment

Filed under chocolate candy, peanut butter

Peanut Butter Blondies with Chocolate and Sea Salt – Football Food!

Today marks the first day of my favorite time of year – football season, which goes until the end of the holidays. I rarely  sit down to actually watch a game, but there is something I love about having it on in the background and my dear hubby enjoying watching his Alma Matter play their hearts out. The weather is starting to cool off, soon the leaves will be turning…it’s the best time of year!

And with football comes football food! I technically made these for a BBQ the day before, but they’d be great for game day. At a BBQ or any similar event you really need a food that is easy to pick up, no utensils needed. Smitten Kitchen saved the day yet again with these fabulous Peanut Butter Blondies with Chocolate Ganache.They are very easy and very addictive. Well, addictive if your favorite combination in the whole wide world is peanut butter and chocolate. And mine is. I hope yours is too.

The batter takes about 10 minutes to make, including gathering up your ingredients (remember, I am slow with this part). It looks just like cookie dough, and I think you could probably actually drop these and make cookies instead.

Then you bake anywhere from 35 to 45 minutes, depending on how you like your edges and how hot your oven is. After it cools completely, make the ganache. If you live in the Oven, aka the South, like me, you might want to put the blondies int he refrigerator to chill, otherwise you’ll be waiting all night. I needed to sleep, so that was not an option.

Pour the ganache on top, sprinkle with sea salt if you so desire. I think it would also be very tasty with some pretzels crushed on top for some added texture and that salty sweet taste. And would also make it more manly than “sea salt”.

And try very hard not to eat them all at once. Thankfully I gave most of mine away and am only left with a few little pieces.  Enjoy, and Go Team!

Peanut Butter Blondies with Chocolate Ganache

Courtesy of Smitten Kitchen

Blondies

  • 2 sticks (1/2 pound) unsalted butter, softened
  • 1 3/4 cups sugar
  • 1 cup creamy peanut butter (I used all natural, fresh ground, honey roasted from Earth Fare)
  • 2 large eggs plus 1 large yolk
  • 2 teaspoons pure vanilla extract
  • 2 cups all-purpose flour
  • 1 1/2 cups semisweet chocolate chips (9 ounces)
  • 1/2 teaspoon salt, see note**

Preheat oven to 350 degrees F with rack in middle. Butter a 13- by 9- by 2-inch baking pan, then line bottom of pan with parchment paper and butter parchment.

Beat together butter, sugar, and vanilla with an electric mixer at medium-high speed until mixture is light and fluffy, about five minutes. Then add peanut butter and beat until incorporated. Beat in whole eggs and egg yolk.

Reduce mixer sped to low, then mix in flour until almost combined. Add in chocolate chips and beat on low until combined. Batter will be very thick!

Bake until blondies are deep golden, puffed on top and a wooden pick inserted in center come out with some crumbs, about 35 to 45 minutes.

Cool completely in pan on a rack, about 1 1/2 hours. Chill if needed.

Ganache
1 1/2 cups semisweet chocolate chips (9 ounces)**
1/2 cup heavy cream
1 tablespoon unsalted butter, softened

*1 1/2 tsp of coarse sea salt for topping

Put chocolate chips  in a heatproof bowl.

Bring cream to a boil in a small saucepan, then pour over chocolate chips and let mixture stand for one minute. Mix with a whisk starting slowly in small circles in the center, slowly working your way out as the chocolate and cream combine.

Gently whisk in butter until it is incorporated, chocolate is melted, and a smooth mixture forms.

Spread ganache on cooled brownies. Sprinkle with sea salt (or pretzels, or nothing at all). Let cool until set. This may take a while if it is hot and humid out, possibly overnight. Chill for a short while (30 minutes tops) if you need to speed things up. Ganache is best at room temperature though.

Slice and enjoy!

7 Comments

Filed under brownies

Chocolate Macarons

I finally attempted macarons again. While my first attempt wasn’t terrible, it wasn’t amazing either. And these cookies are quite intimidating. So much can go wrong. But when they turn out well, they taste amazing. This time I used a recipe from David Lebovitz, but still mostly used Tartelette’s technique.  And my second attempt went much better. Overall they looked better, the size was better, and they tasted better. They were just a wee bit lopsided. But they have feet and they puffed up. Oh, and they were lumpy. Yes, I made an incredibly dumb mistake and didn’t sift my almonds after processing them. Luckily, the lumps didn’t come across in the mouth, just in looks. This really is a cookie where practice makes perfect. The texture this time was much better. Very airy, a little crispy, and then the creamy center. What a great little cookie!

Chocolate Macarons with Strawberry Cream Cheese Filling

Chocolate Macarons From David Lebovitz

Yield 15 cookies

  • 1 cup (100 gr) powdered sugar
  • 1/2 cup powdered almonds, sifted!
  • 3 TB (25 gr) unsweetened Dutch process cocoa powder
  • 2 large egg whites, room temp, 48 hours
  • 5 TB (65 gr) granulated sugar

1. Preheat oven to 350º F (180º C).

2. Line two baking sheets with parchment paper (or silpat) and have a pastry bag with a plain tip (about 1/2-inch, 2 cm) ready. Grind together the powdered sugar with the almond powder and cocoa so there are no lumps; use a blender or food processor. Then sift!

3. In the bowl of a standing electric mixer, beat the egg whites until they begin to rise and hold their shape. While whipping, beat in the granulated sugar until very stiff and firm, about 2 minutes.

4. Carefully fold the dry ingredients, in two batches, into the beaten egg whites with a flexible rubber spatula. Should take about 50 strokes.  When the mixture is just smooth and there are no streaks of egg white, stop folding and scrape the batter into the pastry bag (standing the bag in a tall glass helps if you’re alone).

5. Pipe the batter on the parchment-lined baking sheets in 1-inch (3 cm) circles (about 1 tablespoon each of batter), evenly spaced one-inch (3 cm) apart. I actually used a scoop this time and it worked well. The batter was thick and lumpy because I didn’t sift!

Some of them cracked on top and I’m not sure why….

6. Let rest at room temp for about 30 minutes so the shells can harden, then bake them for 15-18 minutes. Let cool completely then remove from baking sheet. When cool, fill with strawberry cream cheese filling.

Strawberry Cream Cheese Filling, Adapted from Tartelette

  • 4 oz cream cheese, at room temp
  • 3 TB strawberry jam or preserves

Stir to combine. Pipe onto half of macarons and top with the other half. Keep refrigerated.

1 Comment

Filed under Cookies, macarons, Uncategorized

The Cookie that beats up other Cookies

Recently I was watching The Best Thing I Ever Ate: Chocolate on the Food Network (one of the few remaining good shows on that network – jus’ saying). And what do you know, there was the Levain Bakery showcasing one of their most amazing and I’m sure incredibly delicious cookies. I don’t know because I’ve never actually had one before. I just keep seeing them on TV and each time I have to refrain from buying a plane ticket to New York for that very same day. This time they were showcasing their Chocolate Chocolate Chip cookie. Dear God, I think I may have died and gone to heaven! And, at this rate I am going to have to change the name of this blog to “Let’s Talk Chocolate”. I think that is one of those good problems.

My version of the Levain Chocolate Chocolate Chip Cookie.

If you know anything about the Levain Bakery, then you probably know they do not share their recipes. Guess their moms never told them sharing is caring. Or maybe they did, except when it involved a cookie that likely makes them plenty of money, in which case, go moms!  Thankfully we have many other talented bakers out there who are willing to share what they believe to be a very close copy cat recipe. I headed back to the blogger who first introduced me to her copy cat recipe, Lisa Michele. Turns out on the very same page as her Best Chocolate Chip Cookie Ever recipe she also has a Chocolate Peanut Butter cookie, which can easily be adjusted to make a Chocolate Chocolate Chip cookie.

And as luck would have it, I had just ordered two new cocoa powders from King Arthur Flour, their Double Dutch Cocoa Powder and their Black Cocoa. I was very anxious to give these cocoa powders a try in the cookie. (If you don’t have these, I’m sure the cookies will still be amazing, but do try to stay away from not-so-great cocoa powder like Hershey’s and store brands. Those poor quality cocoas will have a detrimental effect on your cookie.)

These are cookies, which means they are very easy to make. I used Lisa Michele’s recipe almost exactly, using the max amount of cocoa she suggests but also adding 1 TB of coffee. In order make them incredibly gooey, you will need to underbake them. However, if you aren’t a big fan of underbaked cookies, they will still taste delightful baked longer.

Fair warning, these are probably some of the most intense chocolate flavored cookies I’ve ever had. They could easily be a brownie. And they do require a scoop of ice cream or a big glass of milk. My dear hubby went crazy for these. I’m sure you will too!

Gooey chocolate chocolate chip cookie with a scoop of coffee ice cream.

Levain Bakery Copycat Chocolate Chocolate Chip Cookies

Modified very slightly from Lisa Michele

  • 2 sticks cold butter, cubed (cold is very important!)
  • 1 1/4 cup granulated sugar
  • 2 eggs
  • 1 TB coffee, cooled
  • 1/2 cup dutch process cocoa** SIFTED
  • 2 1/4 to 2 1/2 cup AP Flour, spoon and sweep method
  • 1/2 tsp kosher salt
  • 3/4 to 1 tsp baking powder
  • 2 cups good quality chocolate (I use guittard)

**I used 1/4 cup + 2TB KAF Double Dutch and 2 TB black cocoa. The black cocoa is not meant to be used all by itself, so you don’t want to use too much. Don’t forget to sift your cocoa powder!

1. Preheat oven to 375F. Line sheet trays with silpat or parchment.

2. Scale all your ingredients. Put the butter back in the refrigerator until you are ready to use it.

3. Cream the butter and the sugar, along with the coffee in a stand mixer fitted with the paddle attachment.

4. Add the eggs, one at a time, mixing until fully incorporated. Then add the cocoa powder (turn the mixer to low or off before doing this to avoid a mess!).

5. Mix the remaining dry ingredients together. Add to wet mixture and mix just until combined. Add chocolate chips and mix briefly.

6. Using a scoop, scoop the dough onto a parchment. The size is up to you, but you will get a gooey cookie with a crisp crust if they are bigger.

The cookie before baking. Yes, the dough tastes good, I tried it.

7. Bake at 375 for 12 to 18 minutes depending on the size. Since they are chocolate, determining if they are done can be a bit challenging and may require a little experimentation. This experimentation will no doubt involve tasting the cookie. Baking can be such a rough job.

Hopefully someday I will be able to try the real thing. I know they ship, but it isn’t the same as getting it from the bakery. Until then, I will enjoy these fresh out of my oven!

Tip: I think I first read this on Lisa Michele’s blog, but I can’t recall for sure. If you are like me, you might just devour all of these cookies within 24 hours. Not a great idea! So to freeze them, scale them out on a sheet pan and freeze. Once frozen, place the dough in a plastic baggie. Then whenever you are ready for a cookie (which is always, right?) just place the frozen dough ball on a sheet pan a bake. No need to defrost!

2 Comments

Filed under Cookies

Nothing says Love like a Chocolate Souffle

Happy Valentines (Hallmark) Day!

My hubby and I don’t really get into the whole Valentines Day thing. We celebrate year round (yes, we are one of those couples) but I will take any excuse to enjoy some chocolate. And what is more decadent than a chocolate souffle? Mmm. Technically I didn’t make these on Valentines Day, but over the weekend. Monday is a work day, and darn it if Congress hasn’t decided that Valentines Day should be a Federal Holiday. What are they thinking? Don’t they realize that we need to celebrate this Hallmark holiday with souffles?


The recipe came from The Bible, aka Bon Appetit Desserts. If you’ve never made a souffle before, you need to change that immediately. A lot of people are intimidated by souffles. They seem complicated. Light, airy goodness must be difficult, right? Wrong! Including bake time, this took me about 30 minutes. And several of those minutes were gathering up the ingredients which I am quite slow doing. You do need souffle bowls – can’t just use any baking cup. Souffle bowls have a straight edge which allows the batter to rise up, giving you the souffle look. But, souffle bowls are insanely cheap. You can find them on Amazon or at Bed Bath and Beyond. And then you can use them as prep bowls when you aren’t making souffles. But that won’t be often since you will want souffle all the time!

This recipe is very, very chocolately. It will satisfy even the pickiest chocolate lover. It actually made me not crave chocolate for at least 24 hours. That’s a long time, in case you were wondering. It is a very romantic dessert.

Now you can easily just have the souffle, or you can top it with ice cream, blackberry would be wonderful. But I wanted something special (and I didn’t have any blackberry ice cream!) so I made a Raspberry Goat Cheese Cream. Oh yeah, it is as good as it sounds. Don’t be afraid of the goat cheese. It is slightly tart but mostly it just adds to the creaminess. If you have friends who don’t like goat cheese, they won’t even know this cream has goat cheese. Give it a try and either add the Chambord or just add vanilla. Or add whatever flavor you think you will like. Orange would also be great. Make it yours!

Happy Valentines Day!

Chocolate Souffle

From Bon Appetit Desserts, page 386

  • 3 TB water
  • 1 TB instant espresso powder, or instant coffee powder
  • 5 ounces bittersweet or semisweet chocolate (do not exceed 61%) chopped
  • 1 TB brandy (key to the rich flavor, but won’t be the end of the world if you omit it)
  • 3 large egg yolks
  • 4 large egg whites, room temp
  • 2 1/2 TB sugar

Note: Gather and measure all your ingredients before you start. It will make things much easier. Also, I only made two souffles and the recipe cut in half did quite nicely.

1. Preheat oven to 400F. Butter four 2/3 cup souffle dishes and coat with sugar. Stir the water and espresso powder in heavy small saucepan until espresso powder dissolves. Add chocolate and brandy. Stir over low heat until mixture is smooth. Remove from heat. Whisk in egg yolks. Cool to room temperature. Move mixture to a large mixing bowl. Be sure to scrape every drop!

2. Beat egg whites in a large bowl until foamy with a hand held mixer. Gradually add 2 1/2 TB sugar and beat until medium firm peaks form.

3. Take about 1/4 of the egg white mixture and fold into the chocolate mixture. This is to loosen up the chocolate mixture. The egg whites are key to the souffle rising properly and if you dump all the egg whites into the mixture, you will likely lose a lot of air. Then, very, very gently fold in the rest of the egg whites. To properly fold, draw your spatula through the center of the whites and then down into the base while turning the bowl.

4. Divide evenly into souffle bowls. Clean up the edges a bit. If you want your souffles to go straight up, overfill the dishes and then scrape off the top and clean off the edge. If you want it to look more homey, just pour it in and let it rise!

5. Bake souffles until puffed but still very moist in the center. It will seem as though it is underdone – this is exactly what you want. Cake like on the outside, pudding like on the inside. Perfection. Dust with powdered sugar and serve immediately.

Raspberry Goat Cheese Cream

Modified slightly from Bon Appetit Desserts, p. 265

  • 1 1/2 cups chilled heavy whipping cream
  • 3 ounces soft fresh goat cheese, crumbled
  • 1/4 cup powdered sugar
  • 2 tsp chambord liqueur, or vanilla or the flavor of your choice; add more or less to taste

1. Combine heavy cream, goat cheese, and powdered sugar in a medium bowl. Add liqueur. Using an electric mixer, beat until mixture is smooth and peaks form. Be careful not to overbeat or mixture will curdle.


4 Comments

Filed under souffle

Triple Chocolate Brownies

The other day I was browsing a magazine and came across a recipe for Chocolate tart. It looked amazing and immediately had me craving chocolate (big surprise, I know!). But I honestly was in no mood for the work a tart would require. However, I still needed to satisfy my chocolate craving. So I turned to my favorite brownie recipe, Martha Stewarts Double Chocolate Brownies. Yes, my title says Triple Chocolate. Well, I’ve made a few changes in the several times I’ve made these brownies. But the base is solid – always delicious and easy. So feel free to make your own changes as they suit you. After all, brownies can be a very personal thing!

Now what makes these triple chocolate? The three forms of chocolate in the brownies: semisweet chocolate, Dutch-process cocoa powder, and my addition, white chocolate. I know white chocolate isn’t technically a chocolate, but for all intensive purposes, we are counting it towards the “Triple” in the title. Here’s a summary of white chocolate, courtesy of Wikipedia. Basically, it is cocoa butter but no cocoa. And I personally still think it is delicious and makes a wonderful addition to these brownies. Add them if you like, or maybe add nuts if you like nuts in your brownies.

The other changes I made were adding 2 TB of coffee (a must in just about any chocolate recipe, in my opinion. Really enhances the chocolate), and for the first time, I sprinkled sea salt on the top, which I will be doing every time now. As Martha says, these bars are solid enough to take on a picnic, or to serve at the end of a dinner party. I’ve done that a couple times and they are always a hit.

The best way to eat this is with a scoop of ice cream – I prefer blackberry. It pairs perfectly with the chocolate. If you can’t find blackberry, then vanilla or coffee will work wonderfully! And of course, they are great all by themselves, no ice cream necessary.

One of the biggest reasons I love this recipe is because it is so easy to make. No need for a box mix when you have this recipe!

Triple Chocolate Brownies

Modified slightly from Martha Stewart Double Chocolate Brownies

  • 6 TB unsalted butter, plus more for pan
  • 6 oz semisweet chocolate, coarsely chopped (I used Guittard – remember to use good chocolate!)
  • 1/4 cup unsweetened Dutch process cocoa powder
  • 3/4 cup all-purpose flour
  • 1/4 tsp baking powder
  • 1/4 tsp salt
  • 1 cup sugar
  • 2 large eggs
  • 2 tsp pure vanilla extract
  • 2 TB strong coffee, cooled
  • 3 oz white chocolate chips
  • Sea salt, as needed

1. Preheat oven to 350F. Line a buttered 8 inch square baking pan with parchment, allowing a 2 in overhang.

2. Put butter, chocolate, and cocoa powder in a heat proof bowl set over a pan of simmering (not boiling!) water. Stir until butter and chocolate have melted. (Since you are melting the cocoa powder, there is no reason to sift. But normally, sift your cocoa powder!) Let cool slightly.

3.  Whisk together flour, baking powder, and salt in a bowl. Put sugar, eggs, vanilla, and coffee in mixer bowl and beat with paddle attachment (original recipe says whisk, I prefer the paddle for a denser brownie. If you’d like yours airier, then use the whisk) and mix until pale, about 4 minutes. Add chocolate mixture and mix until combined. Reduce speed to low and add flour mixture. Mix until well combined, making sure to scrape the sides. Add white chocolate and mix just until combined.

4. Pour batter into prepared pan; spread evenly with a spatula.

Bake about 10 minutes, then lightly sprinkle some sea salt on the brownies. Put back into oven. Bake until cake tester inserted into brownies (not in the center or edges, but somewhere in between) comes out with a few crumbs but not wet, about 35 minutes. However, a little wet will just make for gooier brownies, so if that’s what you like, then by all means take take them out early!

Let cool as long as you can, and satisfy that chocolate craving. Yummy!

1 Comment

Filed under brownies