Tag Archives: pie

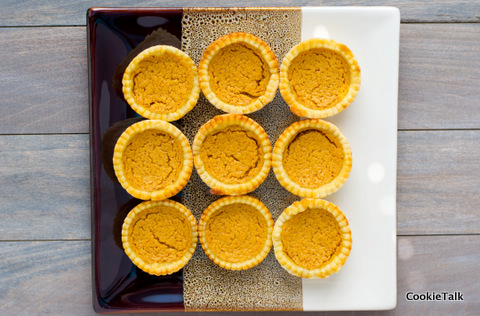
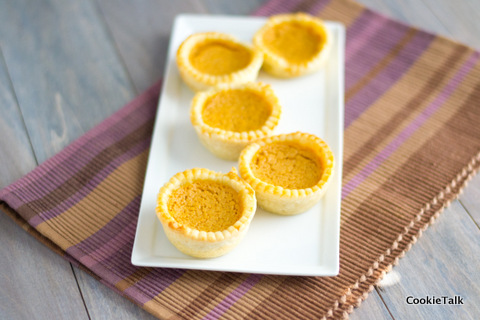
Mini Sweet Potato Pies

I’ve lived in the South for just over two years now and since then I’ve embraced plenty of good Southern food: fried pickles (pure genius!), Real BBQ (sometimes Northerners like to call Sloppy Joes “BBQ”…tsk tsk!),  pimento cheese (more on that soon), and corn bread. But I shunned sweet potato pie. I love sweet potatoes, especially sweet potato fries. But growing up my only impression of sweet potato pie was this sickly sweet thing with marshmallows on top. No thank you!

But as I’ve discovered time and time again, when something is properly prepared it is delicious. Just because you didn’t like it the first time doesn’t mean won’t like it the next time.  So if you too grew up with that marshmallow concoction that was rather scary, give this a try. You’ll be delighted. It tastes like pumpkin pie, and who doesn’t like pumpkin pie?

I made mine mini since they were for a social event and it is much easier to eat mini pies than try and slice out pieces. Takes a bit more time but they are super cute! If you have no need to make mini ones a big pie will be just as tasty.

Mini Sweet Potato Buttermilk Pie

Adapted from Smitten Kitchen

One year ago: Peanut butter blondies with chocolate and sea salt

Yield: One 9 inch pie or about 20 mini pies

Difficulty: Easy

Time: Filling batter 10 minutes if using canned puree; Dough 10 minutes plus chill time; Rolling out dough will depend on whether you are doing mini or full pie

Ingredients

  • 1 1/2 pounds sweet potatoes (about 2 medium potatoes), peeled and chopped into a 1/2-inch dice*
  • 4 tablespoons unsalted butter, melted
  • 2 tablespoons fresh lemon juice (optional)
  • 1/2 teaspoon freshly grated nutmeg
  • 1/2 teaspoon ground cinnamon
  • 1/2 teaspoon kosher salt
  • 3 large eggs, separated
  • 1/2 cup brown sugar
  • 2 tablespoons all-purpose flour
  • 3/4 cup full- or low fat buttermilk*
  • Pie dough

Notes: I used canned organic sweet potato puree, because, well, I had it sitting in my pantry. It worked just fine and sped up the process if you are in a hurry. If you don’t have buttermilk on hand (and really, who does?) make your own by adding 1 TB vinegar to 1 cup milk. Let sit at room temperature until curdled, about 5 to 10 minutes.

Directions

1. Prepare your pie dough. Preheat oven to 350F. If making a full pie, roll out the dough large enough to fit your pie pan and press gently into pie pan. Blind bake (cover dough with foil and fill with dried beans or pie weights) for 10 minutes or until just barely golden. If making mini pies, I used a 4 inch cookie cutter and a muffin tin. You will have to re-roll scraps several times. Chill dough again if it becomes too tough to handle. I did not use weights when blind baking but just pushed it back down after baking. Let cool completely while you prepare your filling.

2. Preheat the oven to 375°F.

3. Pour 1 1/2 inches of water into a 3-quart stock part with a strainer basket suspended over it and bring to a boil over medium-high heat. Add the sweet potatoes, cover and steam until fork-tender, about 20 minutes. Place the steamed sweet potatoes in a large bowl and let cool to room temperature. Mash them into a smooth puree with a food mill. You should have 1 1/4 cups puree; discard any excess. Or just open a can of sweet potato puree and measure out 1 1/4 cups into your mixer bowl. Add the butter, lemon juice if using, nutmeg, cinnamon and salt and mix on low speed until thoroughly combined.

4. In a small bowl, beat the egg yolks lightly with a whisk, about 30 seconds. Add the sugar and beat until they’re a creamy lemon-yellow color, about 1 1/2 minutes. Add the egg mixture to the sweet potato mixture and stir until the eggs are thoroughly incorporated and the filling is a consistent bright orange color. Add the flour a little at a time, stirring after each addition until thoroughly incorporated. Add the buttermilk and again stir until smooth and even.

5. With a cleaned whisk (or electric hand mixer), whisk the egg whites to soft peaks in a clean, dry bowl. With a rubber spatula, gently fold the egg whites into the sweet potato-buttermilk mixture until thoroughly combined. Pour the mixture into the prebaked crust and bake on the middle rack of the oven until the center is firm and set, 35 to 40 minutes. If making mini pies, bake about 20 minutes until center springs back when touched.

6. Remove the pie from the oven and cool completely on a rack. Serve at room temperature (or cold from the fridge; you can cover it with plastic wrap before chilling) with a dollop of whipped cream. Enjoy!

4 Comments

Filed under baking, Pie

Fruit Crostata (Galette aka Free Form Tart)

Let’s start with the exciting news! My blog was nominated for the Blog on Fire Award by One Picture, A Million Words! I’m so honored to be nominated! Thank you! There are official rules to accepting this nomination, including nominating eight other blogs and sharing eight things about yourself. I’m still working on that part (hey, I need to be thorough! Don’t rush me!) but I just wanted to formally say “thanks” for the nomination! Post coming soon with my eight nominations.

I love The Chew. Yes, I’ve mentioned that before but every week I laugh at their antics, drool over the food, and get inspired by this show. It’s so genuine and so unlike any other cooking show!  We’ve made dozens of recipes from the show and most have been fantastic. Last week I made Carla’s Blooming Onion (or rather, “Flower Power”). We’ve done several Sunday Suppers from The Chew as well.

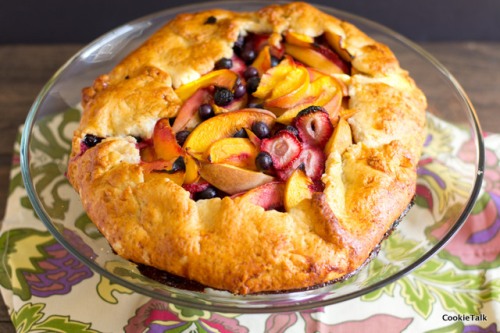
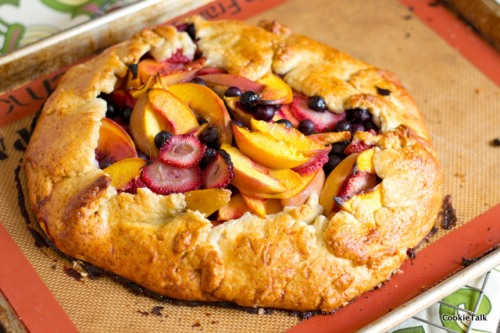
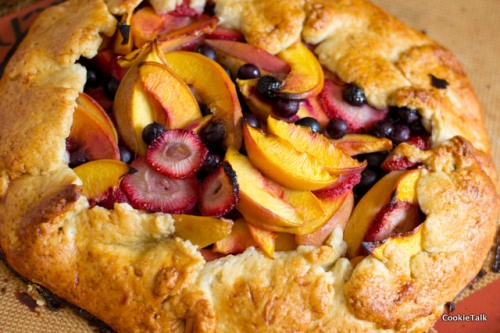
I didn’t tweak this crostata at all, except for the type of berries I used. Mario used all blackberries, but I used strawberries and blueberries, along with peaches of course, because that is what I had available. You could use any fruit and it would be delicious. I’m looking forward to trying it with apples and cranberries this fall. The dough is so easy to work with and actually one of my favorite doughs that I’ve had. I’m not a big fan of pie, I mean, I ‘ll eat it, but the crust is my least favorite part of a pie. Not for this crostata! I probably could have eaten it all by itself. Ok, maybe a little fruit.

Don’t skip the honey and egg glaze…makes it oh so irresistible!

Crostatas (galette) are a lot easier and more forgiving than a pie. If you are afraid of making pie because of the crust looking crazy, then this is for you! It’s supposed to look a little crazy! That makes it “rustic” and therefore cool. Don’t you love that? I sure do.

Peach & Berry Crostata

From Mario Batali

One year ago: Lime & Blackberry Italian Meringue Pie (funny that a year ago was a pie, don’t you think? It’s a good one too!)

Yield: One 12 inch crostata

Difficulty: Easy

Time: Hands on 20 minutes; chill time 30 minutes; bake time 1 hour

Ingredients

  • For the Dough:
  • 2 1/2 cup Cake Flour (plus more for dusting)
  • 3 tablespoons Sugar
  • 1/2 teaspoon Salt
  • Grated Zest of 1 Lemon
  • 1 cup (2 sticks) cold unsalted Butter (cut into small chunks)
  • 1/4 cup Ice Water plus more if needed
  • For the Filling:
  • 5 Large Ripe Peaches (pitted and cut into 16 slices each)
  • 2 pint Fresh Blackberries
  • Juice of 1 Lemon
  • 3 tablespoons Sugar
  • 1 tablespoon All-purpose Flour
  • To Finish:
  • 2 tablespoons Honey
  • 1 Large Egg (at room temperature)
  • 1 cup Mascarpone or Freshly Whipped Cream

Directions

1. Add flour, sugar, salt, and lemon zet to food processor or stand mixer with paddle attachment. Mix briefly to combine. Add butter and mix until coarse crumbs (if using food processor then pulse quickly). Add water 1 TB at a time, allowing plenty of time between additions to be absorbed. Add until dough comes together but is not wet or sticky. Should be easy to handle. If you add too much water, add a tablespoon of flour. Flatten into a disk, wrap in plastic, and chill for at least 30 minutes.

2. Meanwhile, preheat your oven to 365F. Slice your peaches into approximately 16 slices each. If you are using strawberries, slice them too. Add  the lemon, sugar, and flour to the fruit and toss gently to combine. Set aside.

3. Remove dough from refrigerator. If it is too cold, let soften at room temperature a little. But, colder dough is easier to work with so don’t let it warm up too much. Colder dough will require less flour to dust. Dust your work surface and rolling pin very lightly. The more flour you add, the tougher your dough will be so refrain from constantly dusting your dough. Move it around frequently to keep it from sticking. And, don’t worry about it being perfect. We’re going for rustic, remember? Roll it to about 16 inch circle and 1/4 inch thick.

5. If you have a 12 inch tart pan with removable bottom, you can use that. I only have a 9 inch and that would have been too small. Thus, I just used a sheet pan and did free form. Do whatever is easiest for you. If you do free form, just place the dough on your sheet pan (lined with parchment or silpat). It may hang over a bit at first but you’ll fix that in a second.

6. Dump your fruit into the center. I actually had to take some of my fruit out because it was too much! Once the fruit is in the center, fold the edges in, leaving plenty of the fruit to show, but make sure it is also folded over enough so the fruit doesn’t fall out. There’s no rule on how to do this, just fold it over so that it stays together and the fruit stays put.

7. Mix together the honey and egg and brush over the entire crostata, including the fruit. It will act as a delicious glaze and help the crostata brown nicely.

8. Bake for about 1 hour to 1 hour and 10 minutes. Start checking about 50 minutes. Once it is golden brown and the fruit bubbly, it is ready!

9. Top with fresh whipped cream (I’d avoid adding sugar to the whip cream…otherwise it will be too sweet) and enjoy!

3 Comments

Filed under baking, Pie

Lime & Blackberry Italian Meringue Pie

Gorgeous pie, isn’t it? It is absolutely heavenly to eat. And utterly exhausting to make. It took two days and many steps. So let’s call this a “Special Occasion” dessert. I think a wedding cake might be less work. Ok, now I’m just getting carried away.

This pie was on the most recent issue (August 2011) of Bon Appetit. And what do you know, I had just gotten a brand new kitchen torch! What are the chances?

I’m not a big pie person. I mean, I love to eat pies  (who doesn’t?) but I don’t really love to make pies. I think it might be the dough. I don’t really like rolling out dough, but this dough was quite easy to roll out and easy to work with. It is mostly butter with just a wee bit of shortening (another chance to use my organic shortening!) to keep it flaky. And when it bakes, it actually tastes like a cookie! Love it! I made the dough the day before and baked it the next day.

Moving up…the compote. I reduced mine down to half a cup as directed, and I used a Pinot Noir but I thought it was still a bit too runny. So I soaked the berries (added a few blueberries since I was low on blackberries. Darn heat) in the wine sauce for a couple of hours, then strained out the berries adding only a bit of the sauce. I kept the rest of the wine sauce for another day.

Up next, the curd. This was delicious and pretty straight forward. I used key limes since that was all I had, plus added a bit of store bought (organic) lime juice since I didn’t have enough key limes to get a full cup. I made it the day before so it had plenty of time to chill. And for the cream, well, I like to put liqueur in my cream, so I added a bit of chambord, but I think grand marnier would work great too. Before whipping the cream, place your bowl in the freezer for 10 minutes or so. It will keep the cream cold so it whips better. I also used sheet gelatin, but that is just a personal preference and will have no affect on the final product.

Finally, the meringue. I’ve done meringue many times, but I still worry every time that I will mess it up. In truth, I think it is pretty hard to truly screw up a meringue. This one is Italian, so you beat the room temperature eggs first, and then add the hot sugar. If you’ve never done sugar like this, the key is Not To Stir. That’s right, just let it be. You can give it a slight swish when you first combine the ingredients, but then just leave it alone. If you don’t have a thermometer, never fear. You can check the temperature by first watching the bubbles. They will start to get smaller. As they start to get smaller, take a spoon and scoop out a tiny bit and put it in ice water. After it cools, try to form it into a little ball. If it holds it’s shape, it is ready! This is called the “soft ball stage.” And move quick at this point or you will have caramel. So you should already have your egg whites whipped and ready to go. Be careful to pour the sugar on the side and not onto the whip, otherwise sugar will go everywhere (and that might hurt!). Whip until the bowl is cool to the touch and the meringue holds its shape. Then “artfully” arrange on the pie.

And then if you have a torch, play with fire! If not, the oven will work too, just not as much fun.

Beware, the first piece will not be pretty. Heck, even the second piece wasn’t. I’m not the least bit surprised that BA had the whole pie picture and not a slice. But it doesn’t matter. It tastes amazing. Sweet, tart, crunchy, soft. Delicious.


Here’s the recipe, courtesy of Bon Appetit

Ingredients

Lime Curd

  • 1 cup fresh lime juice
  • 3 large eggs
  • 3 large egg yolks
  • 3/4 cup sugar
  • 1/2 cup (1 stick) unsalted butter, room temperature
  • 1/2 teaspoon unflavored gelatin
  • 3/4 cup chilled heavy cream

Blackberry Compote

  • 1 cup fruity red wine, such as Shiraz or Cabernet Sauvignon
  • 1/2 cup sugar
  • 3 cups blackberries
  • 1 Blind-Baked Pie Crust in a 9″ deep-dish glass or metal pie pan (see Master Pie Crust recipe)

Meringue

  • 3 large egg whites, room temperature
  • 1 cup sugar
  • 2 tablespoons corn syrup
  • 1/8 teaspoon kosher salt
  • 1 cup blackberries (about 1/2 pint)

Preparation

Lime Curd

  • Set a strainer over a medium bowl; set aside. Stir lime juice, eggs, egg yolks, and sugar together in another medium bowl. Set bowl over a large saucepan of gently simmering water (do not allow bottom of bowl to touch water). Whisk until mixture has thickened, the whisk leaves a path when lifted from curd, and an instant-read thermometer registers 175°, about 15 minutes. Add butter to curd, one Tbsp. at a time, whisking to blend between additions. Strain curd into prepared bowl. Press plastic wrap directly onto surface of curd. Chill until cold, about 2 hours. DO AHEAD Can be made 2 days ahead. Refrigerate curd.
  • Sprinkle gelatin over 2 Tbsp. water in a small bowl; let stand until gelatin is soft, about 10 minutes. Using an electric mixer, beat cream until soft peaks form. Add gelatin mixture; continue beating cream until just before firm peaks form. Fold whipped cream into lime curd. Cover; chill.

Blackberry Compote

  • Bring red wine, sugar, and 1/2 cup water to a simmer in a medium saucepan over high heat; reduce heat to medium and simmer until reduced to 1/2 cup, 20-25 minutes. Let cool. Add 3 cups berries; fold gently to coat.
  • Spread compote in an even layer over baked crust. Spoon lime curd over berries, smooth top, and chill for 1 hour.

Meringue

  • If toasting meringue in oven, preheat oven to 450°. Place egg whites in the bowl of a stand mixer fitted with a whisk attachment. Beat whites in mixer until soft peaks form. Set aside. Stir sugar, corn syrup, and 1/4 cup water in a medium saucepan over medium-low heat until sugar dissolves. Attach a candy thermometer to side of pan. Increase heat to medium-high and boil without stirring, occasionally swirling pan and brushing down sides of pan with a wet pastry brush, until thermometer registers 238°, 6-8 minutes. Remove pan from heat.
  • Meanwhile, beat whites in mixer until soft peaks form. Beat in salt.
  • Slowly pour hot sugar syrup down side of bowl into whites and beat until meringue is firm and glossy. Continue beating until cool, about 4 minutes. Spoon meringue over lime curd, leaving a 1″ plain border, and sculpt decoratively. Tuck 1 cup berries in and around meringue.
  • Bake pie until meringue is toasted in spots, 3-5 minutes (or use a kitchen torch to brown). Chill for 30 minutes before serving. Do Ahead: Pie can be made 3 hours ahead. Keep chilled.

10 Comments

Filed under Pie

Cinnamon Apple Pie Pockets

My husband takes most of my baked goods to work to share with his co-workers. We certainly can’t eat everything and I enjoy making them goodies. Since it is fall, I wanted to make something with apples. Of course I first think of apple pie! However, pie is not an easy item to take into work, nor is it easy to serve. I like to send in goodies that people can grab and go. So, I made mini apple pies. I suppose we could call them apple empanadas, since that is what they look like.  But I like pockets. It’s cute.

Apple pie filling is great because you can adjust it to suit your tastes. Don’t like as much cinnamon? Easy! Less sugar? No problem! This is just what I like, but please, adjust it to suit your taste buds…after all, those are the ones that matter!

Pie Dough

I recommend making this the day before so it can chill overnight and will also give you less do to on baking day.

  • 500 g AP flour (about 4 cups)
  • 2 tsp salt
  • 2 TB sugar
  • 1 TB cinnamon (optional)
  • 350 g butter (3 sticks)
  • Ice water, about 2 TB

Place flour, salt, sugar, and cinnamon into a food processor and pulse until well blended. Cube the butter and add to food processor. For a mealy pie dough, pulse until consistency of corn meal. For flaky, until pea size. For these pockets, mealy will hold together easier. Be careful not to over mix the dough! If the flour absorbs the butter, you will not be able to add the water. Just short pulses until the right consistency. Then add the water, 1 TB at a time until dough pulls together to form a ball. Wrap in plastic and chill overnight, or freeze until ready for use.

Apple filling

It’s important to use apples that will hold their shape. A  soft apple will quickly turn to mush and you will have applesauce instead. I used Rome apples because they were on sale, but my preferred apple is Granny Smith.

  • 3 pounds of apples, peeled and sliced into wedges
  • 1/2 cup sugar
  • 1/4 cup + 1 TB brown sugar
  • 3 TB butter
  • 1 1/2 tsp salt
  • 1 1/2 TB cinnamon
  • 1/4 tsp nutmeg
  • 1/4 tsp cloves
  • 1/4 tsp ginger
  • Zest of 1 lemon
  • Juice of 1 lemon
  • 1 TB cornstarch
  • 2 TB cold water

Place all ingredients except the cornstarch and water into a large, heavy bottom pan. Stir to combine and warm over medium heat. Whisk together the cornstarch and water (add more or less water if needed). Once the apples are warm, but not hot, slowly stir in the cornstarch mixture. Bring to boil. Turn heat to low and cook until apples are slightly tender, but warm. Cool completely.

Transfer in small batches to a food processor and pulse slightly to make the apple pieces smaller. Be careful not to puree! I think it is easier to process after cooking because if the apple pieces are too small they will become mush too easily when cooking. And just slicing makes them too big for the small pockets.

Assmebly

Yield: about 27 pie pockets

Preheat oven to 375F.

I used a four inch cutter, but you can use whatever size you have. If you don’t have a cutter you can use a bowl and a pizza wheel.

Let your dough come to room temperature. Lightly flour your surface and roll to about 1/8″. A good way to get your dough even is to use dowels. You can pick up multiple sizes at the hardware store and then use them for cookies, scones, and pie! Also, to avoid using excessive flour (which will just result in a tough dough) constantly move your dough around. If you roll too long in one spot, it will start to stick.

Cut out the pie dough and place on a sheet pan lined with either a silpat or parchment.

Place one teaspoon of filling in the center (I used a scoop to ensure all are even). Gently fold over to match up the edges, then use a fork to seal. Brush egg wash (just an egg and water) over the entire surface and sprinkle with sanding sugar. If you don’t have sanding sugar just use any sugar you have. Turbinado sugar would be a great touch!

Bake until golden, 15 to 20 minutes. If you used cinnamon in your dough, it will be harder to tell when it is golden, so keep a close eye not to burn.

Let cool as long as you can before devouring with a scoop of ice cream! Your co-workers will love you for these!

Note: You will end up with extra apple filling. Either make less or do what we did…put it on your waffles, pancakes, or something equally delicious for a special breakfast. Yum!

Leave a comment

Filed under Pie